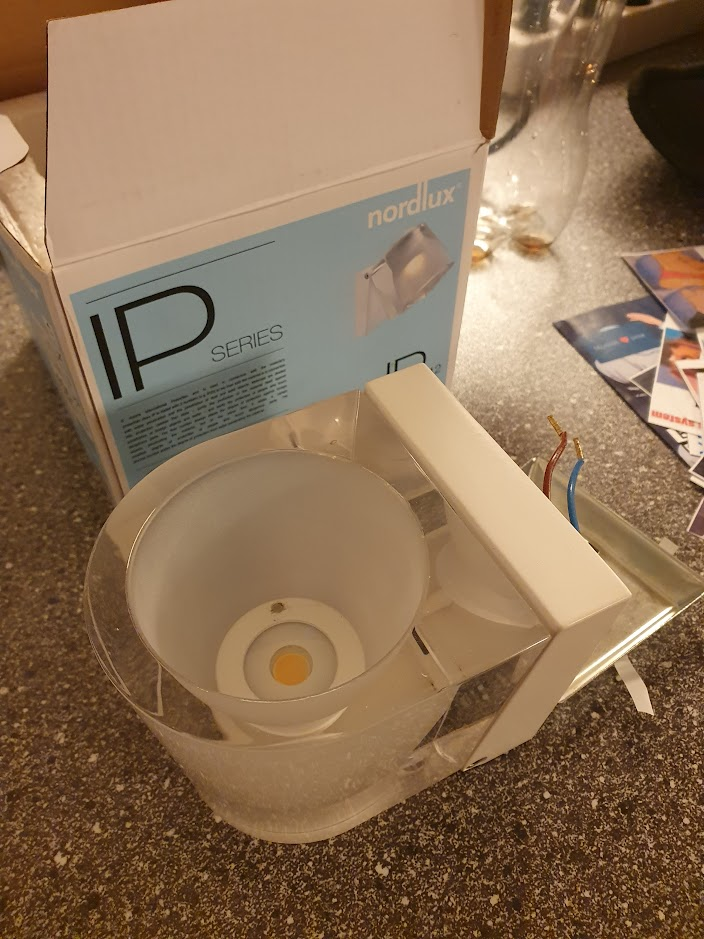
Denne badeværelseslampe er udgået af produktion, og pga. monteringen og at man ofte har mere end én er det noget træls at skulle udskifte – det giver ihvertfald en del skrot uden grund. Heldigvis er konstruktionen super simpel: det er udelukkende en LED driver (230V AC til 24V DC) og en LED.
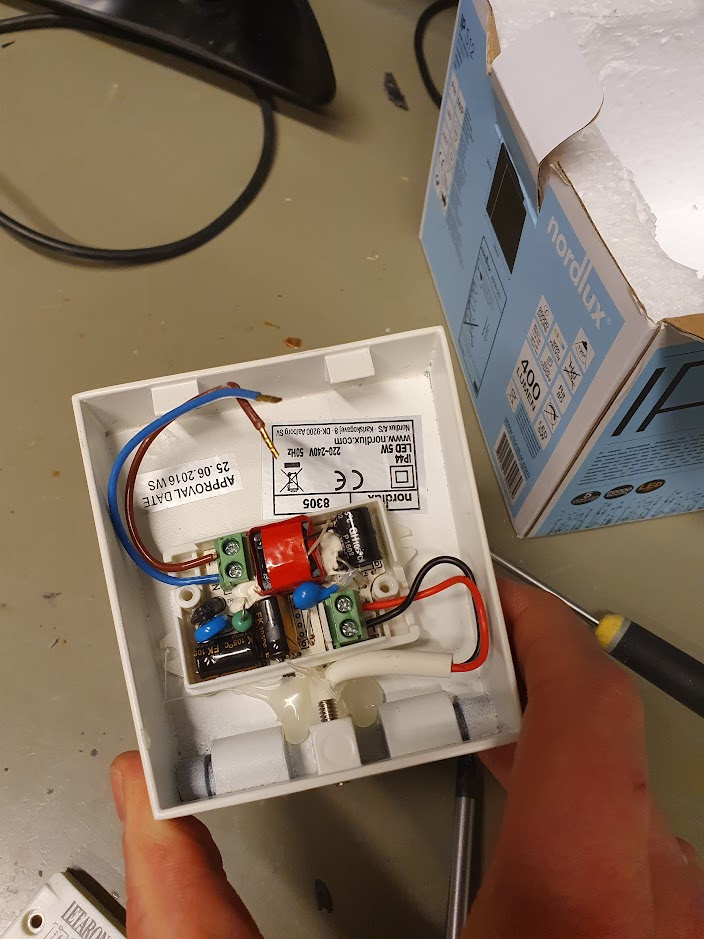
Lad os starte med det nemme: LED-driveren er direkte tilgængelig bagfra, og med lidt forsigtighed kan spændingen udmåles. I dette tilfælde var der ca. 24V DC, og det er jo fint indenfor specifikationen.
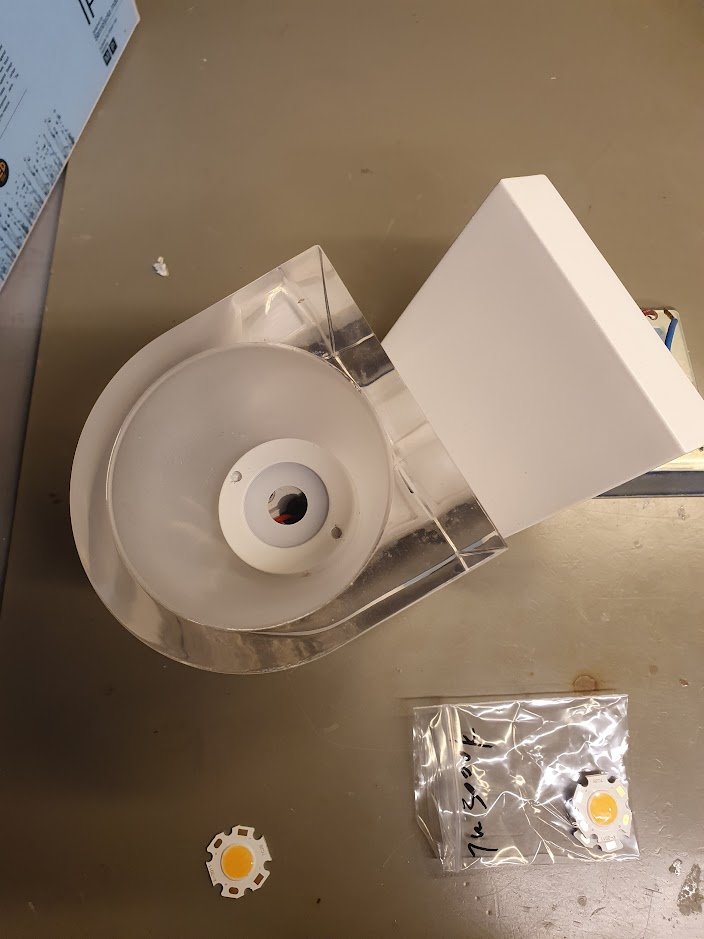
Selve LED’en er lidt sværere at komme til: fronten af glasset skal drejes af via de to huller deri. Jeg brugte en låseringstang af ca. korrekt dimension, med lidt forsigtighed. Lidt ridser gør nok ikke det store når lyset skinner. LED’en kan nu loddes af.
En ny LED kan købes for ca. 10 kr, f.x. på AliExpress. Det rigtige søgterm er måske “Bridgelux 2020 COB LED”, jeg endte med en 7W i Warm White (3000 Kelvin).
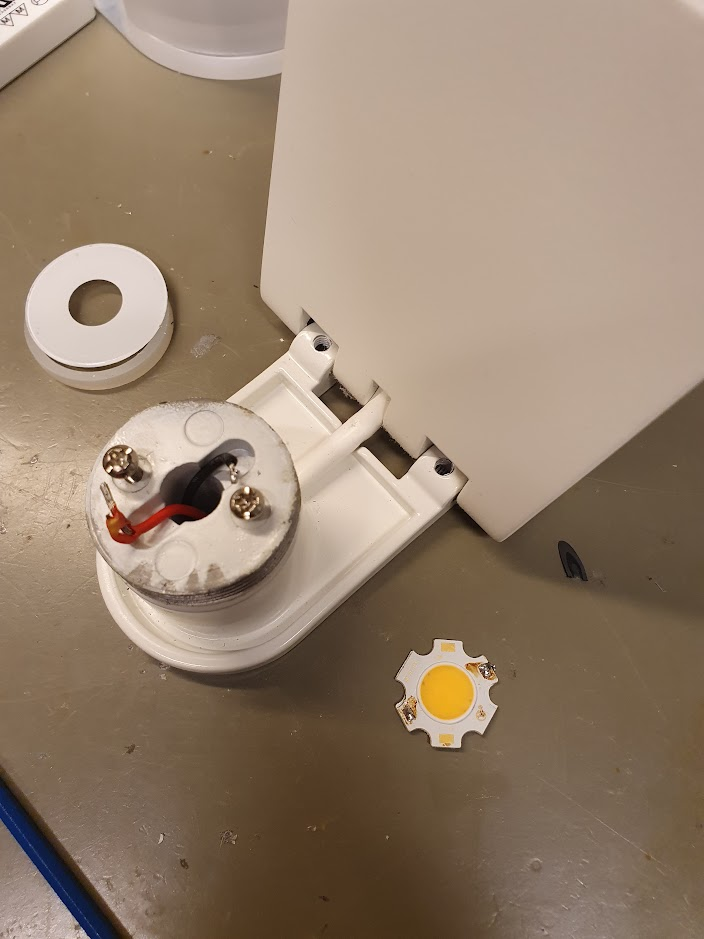
Efter lidt fidlen og lodden er den nye LED monteret, og kan testes. Stor succes!
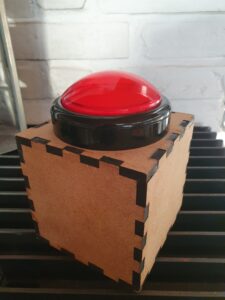
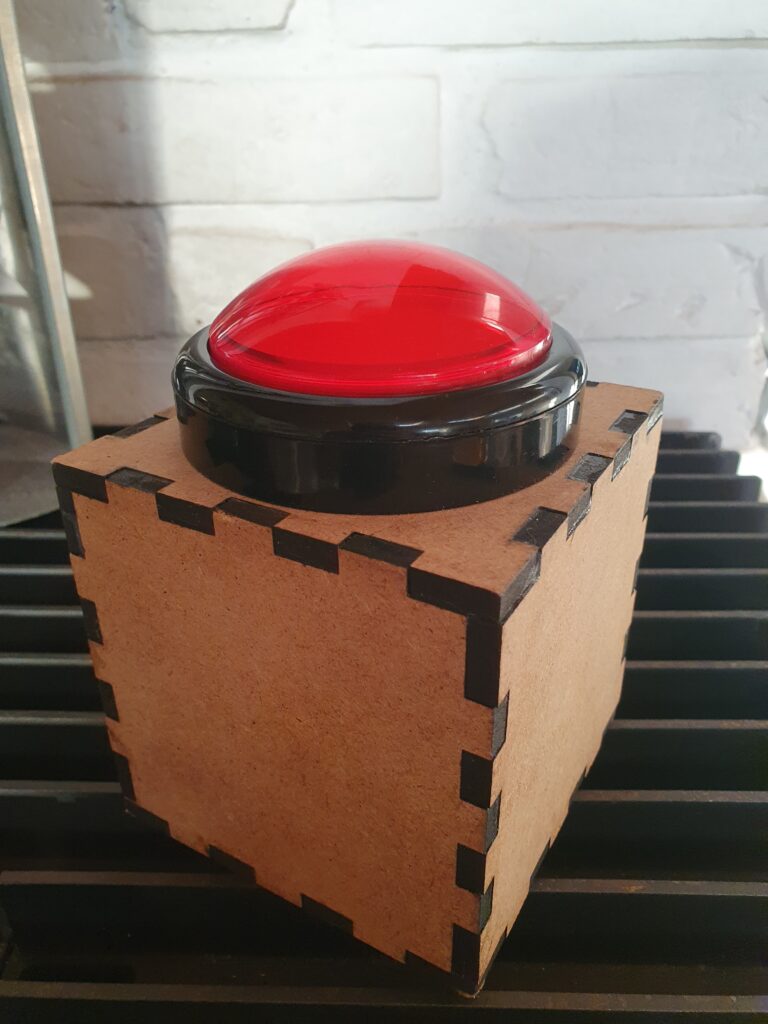
I wanted the physical appearance to be extremely minimalistic, with slight references to various cubes from videogames. Because it is a remote control, it of course has to be wireless and battery-powered.
The electronics inside is a battery-powered Wemos D1, along with 4 x 18650 Lithium battery cells. After some experimentation on the response time, which is primarily dominated by the time it takes to reconnect to the WiFi network, I initially only used “light sleep”. This resulted in a battery time of just over a week, which is okay, but not great.
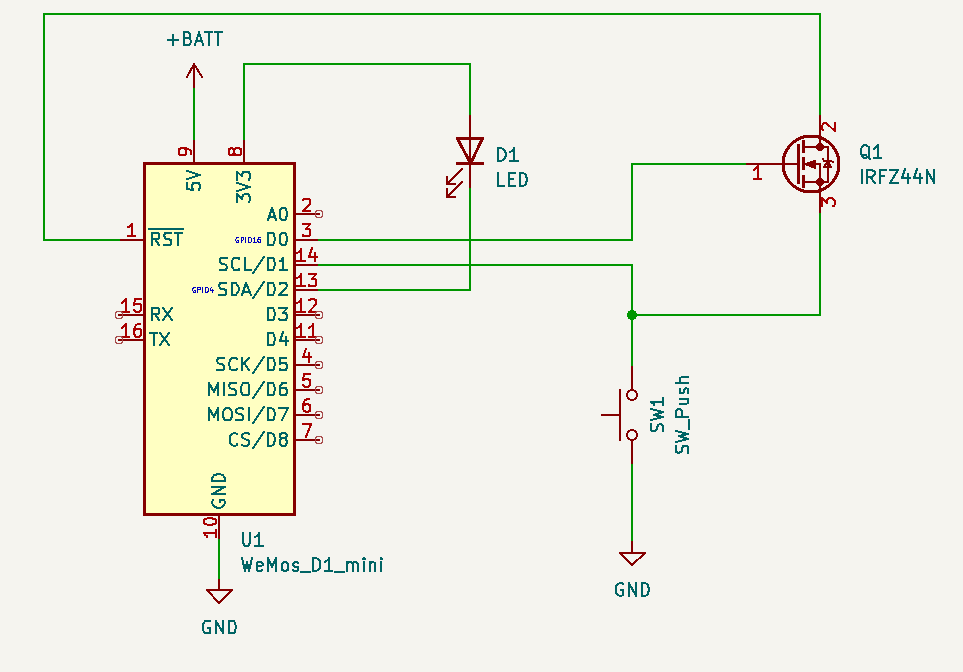
In order to preserve battery deep sleep would be really nice. The problem is deep sleep on the Wemos can only be interrupted by a reset. The idea was to use a MOSFET (in this case an N-channel logic level mosfet, IRFZ44N) for the Wemos to be able to select whether a press of the button should reset it, or it should just register on a pin as normal.
This circuit allows RST to be pulled low by the button, as long as D0 is high. Luckily, D0 is high during deep sleep, so as long as the Arduino code keeps D0 low button presses will not reset — but can still be registered by reading pin D1.
This works out “responsively enough” because the initial start has some delay due to the Chromecast initializing the app and loading media. Any subsequent button presses within the 30 seconds the Arduino stays awake are instant though. With this setup the battery life is not a problem – I’ve only had to charge it once. As a bonus feature/bug whenever the battery gets low the Wemos will trigger a bit sporadically: this causes “Fantus-bombing” where Fantus will just randomly start; quite quickly thereafter the Fantus-button is being charged
The Wemos itself is not powerful enough to do all the pyChromecast communication needed, so I setup a small Raspberry Pi to handle that part. Since I didn’t want to spend too much time and effort setting up the communication between them, I ended up using a trick from my youth: UDP broadcasting. Because UDP is datagram-oriented you can send a UDP packet to the broadcast address (255.255.255.255) and then it will be received by all hosts on the local area network: no configuration needed. In Arduino code it looks like:
At this point I had a UDP packet that I could receive on the Raspberry Pi, and it was just a matter of writing a small server program to listen, receive and process those UDP commands. However, at this point a thought entered my mind, that derailed the project for a while:
netcat | bash
Why write my own server to parse and execute commands, when Bash is already fully capable of doing exactly that with more flexibility than I could ever dream of? And netcat is perfectly capable of receiving UDP packets? This is a UNIX system, after all, and UNIX is all about combining simple commands in pipelines — each doing one thing well.
The diabolical simplicity of just executing commands directly from the network was a bit too insecure though. This is where Bash Restricted mode enters the project: I wouldn’t rely on it for high security (since it is trying to “enumerate badness“), but by locking down the PATH of commands that are allowed to execute it should be relatively safe from most of the common bypass techniques:
The project was now fully working: press the button, Fantus starts. Press it while Fantus is playing: Fantus pauses. Press it while Fantus is paused: Fantus resumes. The little human was delighted about his new powers over the world, and pressed the button to his hearts content (and his parents slight annoyance at times).
But remote control is possible using e.g. pychromecast which has support for not only the usual app of YouTube, but also a couple of custom ones like BBC. Let’s try and add support for DRTV to pychromecast, starting at the hints given on adding a new app.
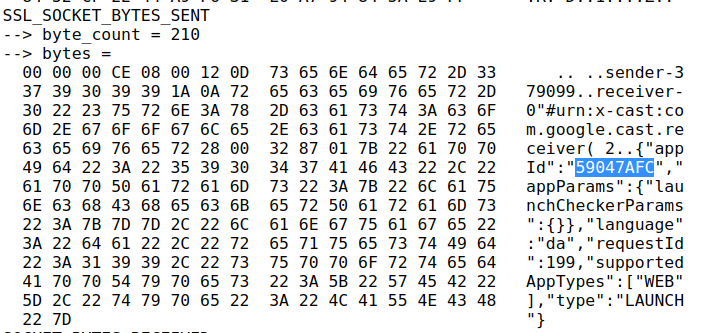
Using the netlog-viewer to decode the captured net-export from Chrome, and looking at the unencrypted socket communication, the appId of the DRTV app is easily found.
However, one of the subsequent commands has a lot more customData than I expected, since it should more or less just be the contentId that is needed:
Here I spent a long time trying without any customData, and just using the appId and contentId. Initially it seemed to work!
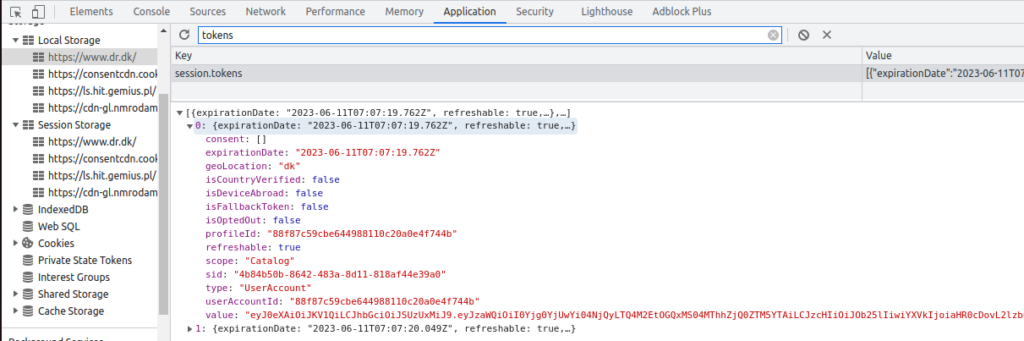
However, it turned out it only worked if the DRTV Chromecast app was already launched from another device. If launched directly from pychromecast the app would load, show a spinner, and then go back to idle. Here much frustration was spent; I guess the customData is actually needed. And indeed, putting that in works! But where do these tokens come from, and how do we get those tokens from Python?
Using Chrome’s developer tools (F12) on the DRTV page, and then searching globally (CTRL-SHIFT-f) for various terms (“expirationDate”, “customData”, “profileToken”, “accountToken” etc.) revealed some interesting code, that was as semi-readable as any pretty-printed minifyed Javascript. Eventually I found the tokens in local storage:
Using these tokens work really well, and allows starting playback!
Some further exploration proceeded: using the showDebugOverlay flag reveals that the DRTV player is just a rebranded Shaka Player. The autoplay functionality can be disabled by setting chainPlayCountdown to -1, which is honestly a real oversight that it cannot be disabled officially, to not have to rush to stop the playback of the item before the next autoplays.
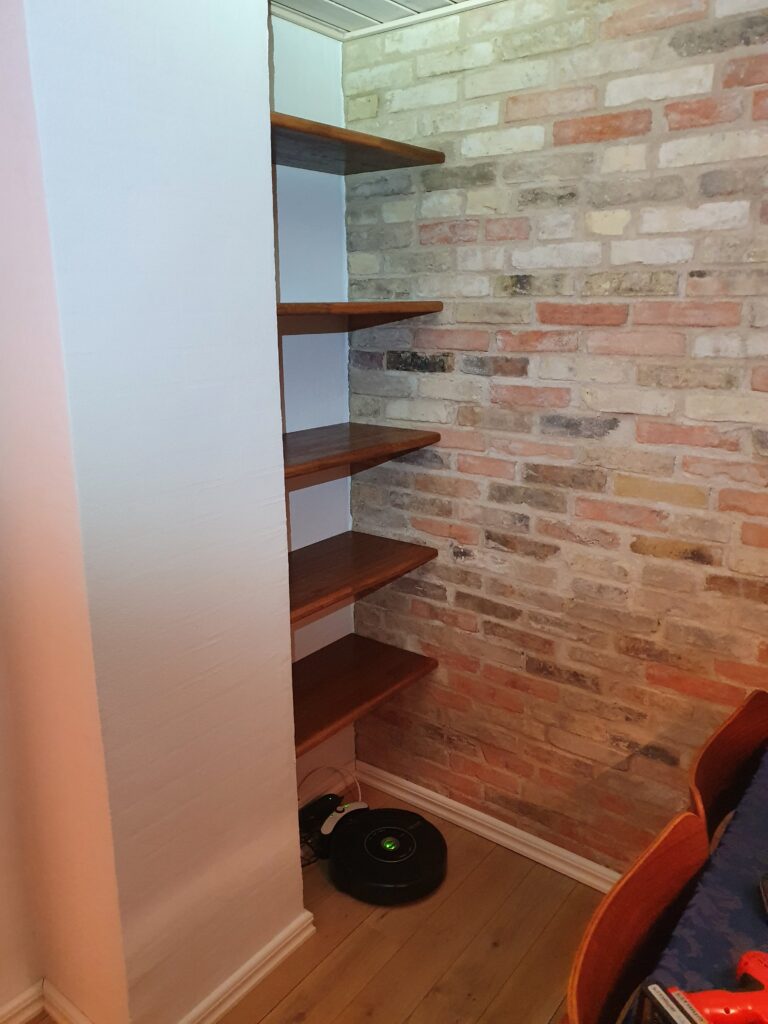
I have an alcove where I wanted to put in some floating shelves. I wanted to use some solid wood I had lying around, to match the rest of the interior; this ruled out most of the methods described online: (i) building up the shelf around a bracket, and (ii) using hidden mounting hardware would be hard to get precise and would not provide support on the sides.
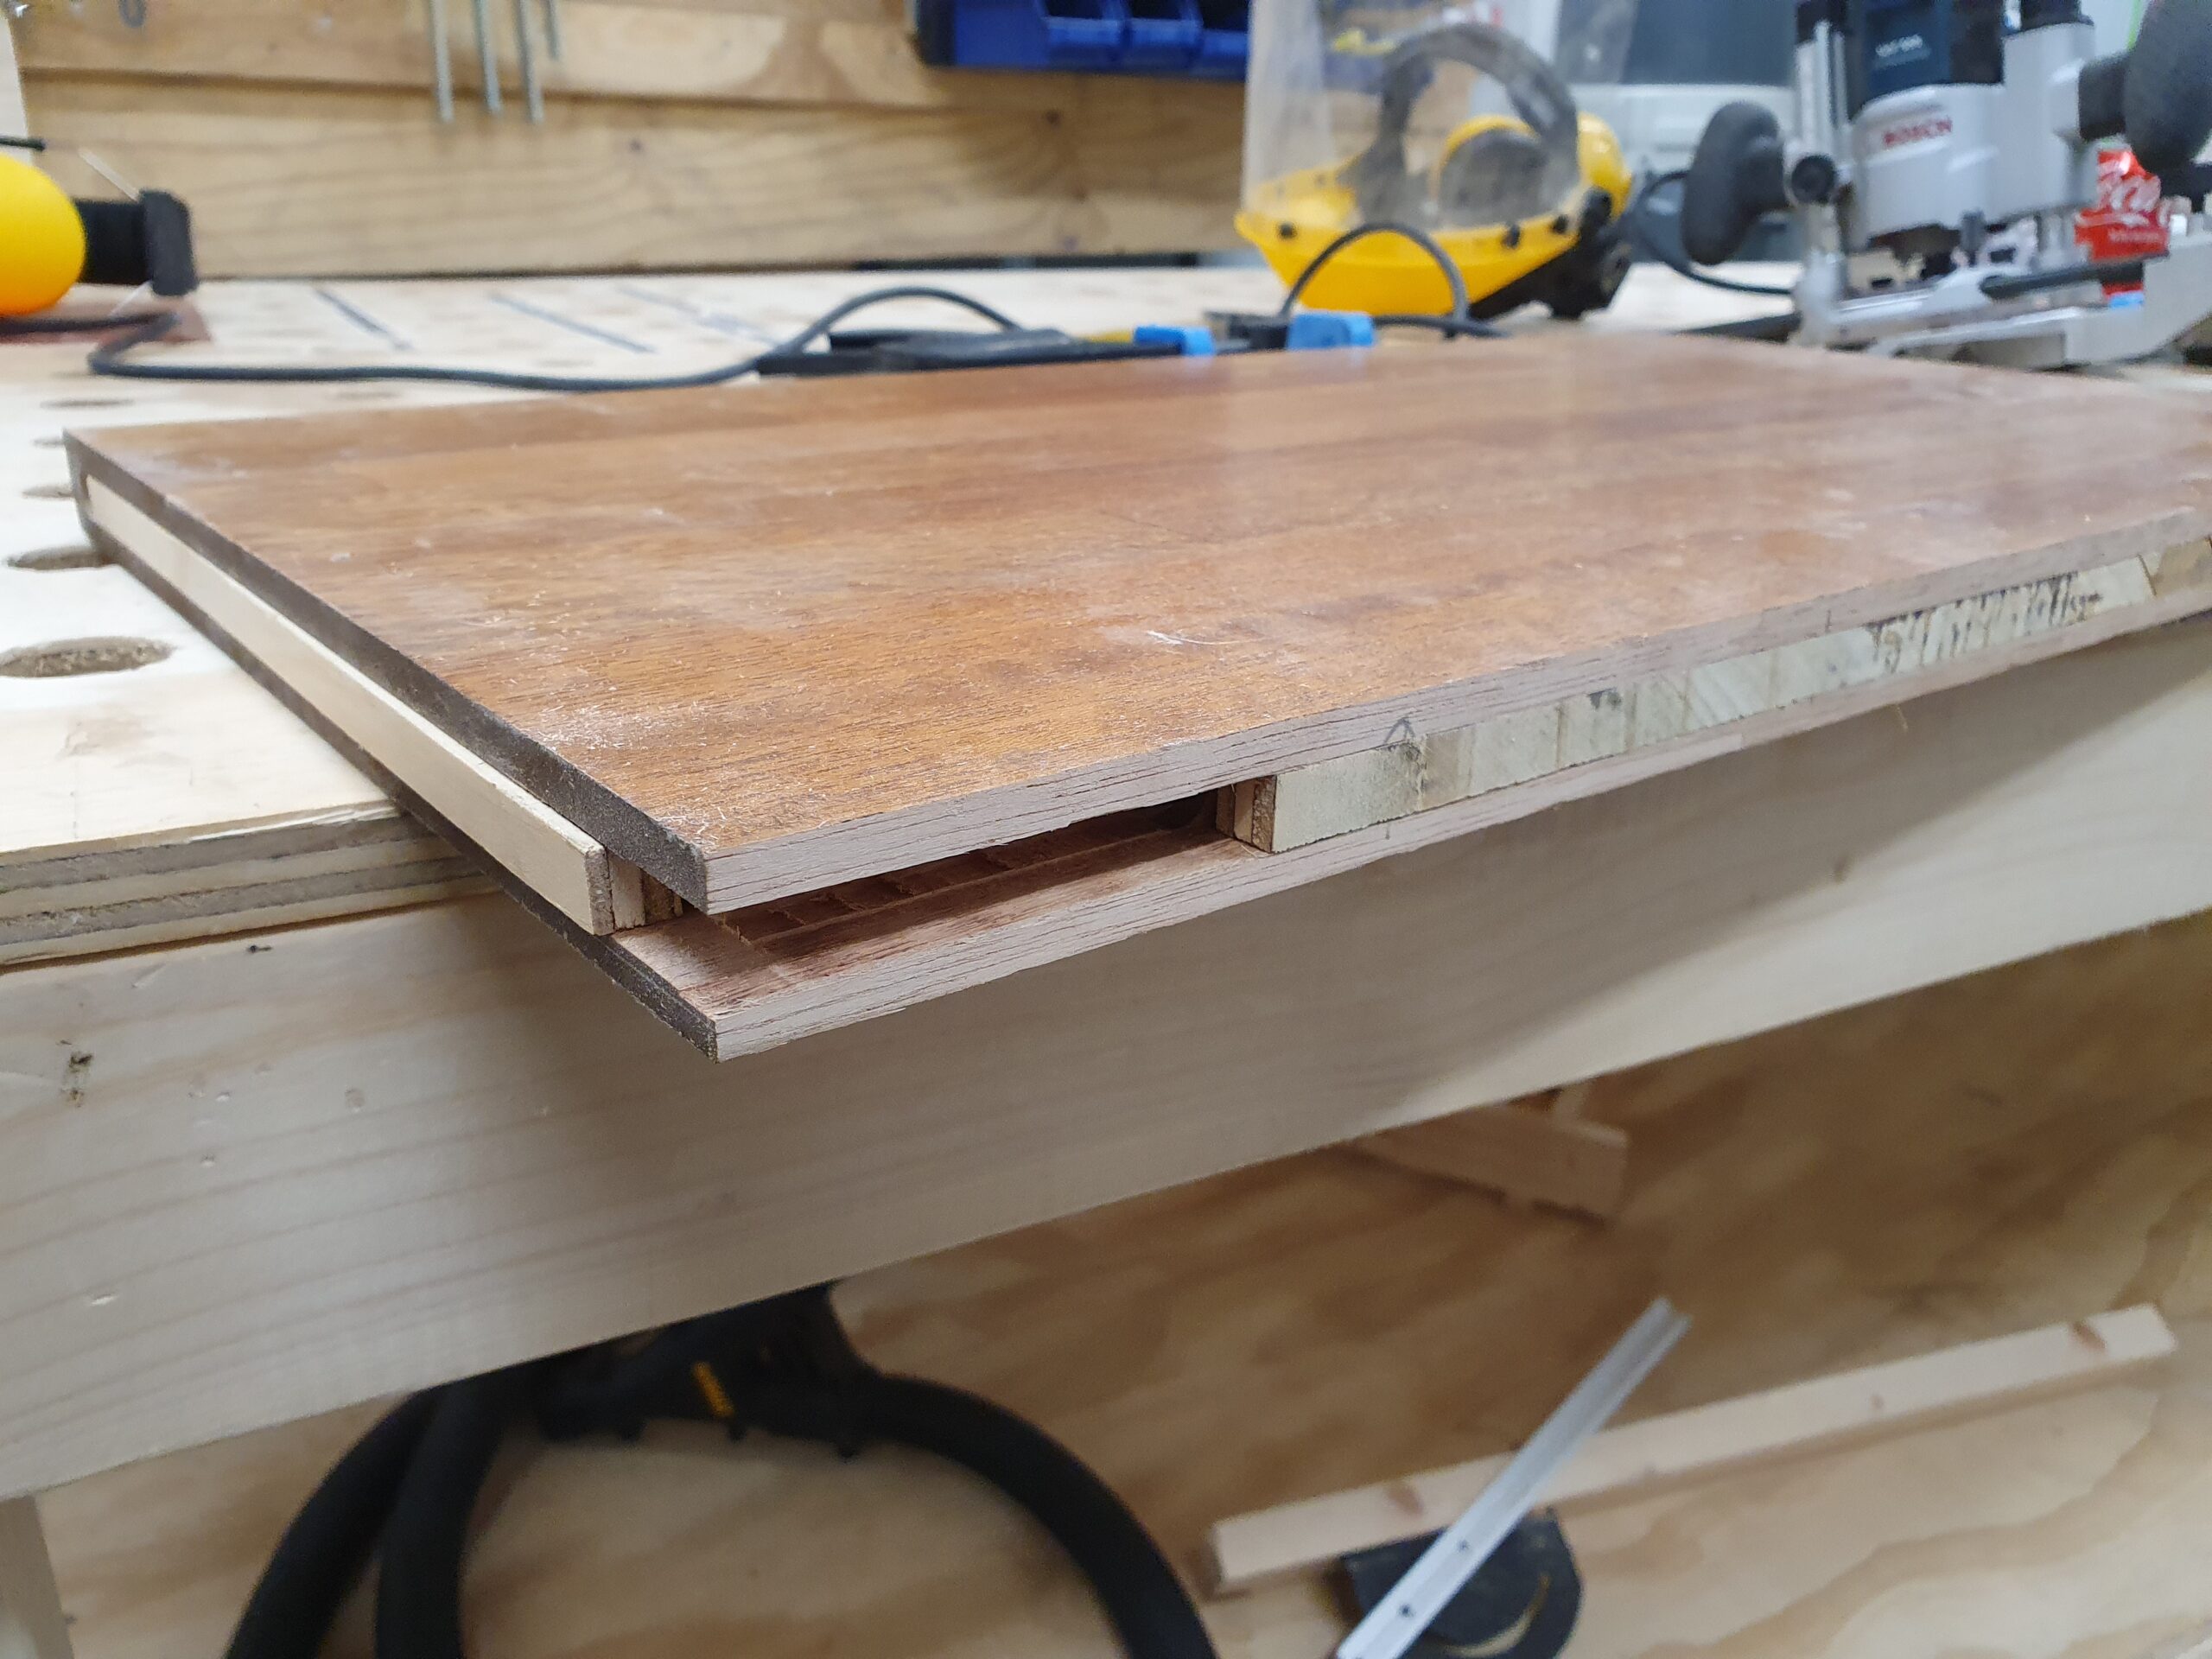
So inspired by some of the options instead I tried to get by with just brackets on the three sides, in a solid wood shelf. I ended up with 12mm brackets of plywood in a 26mm solid wood shelf, and that was plenty sturdy.
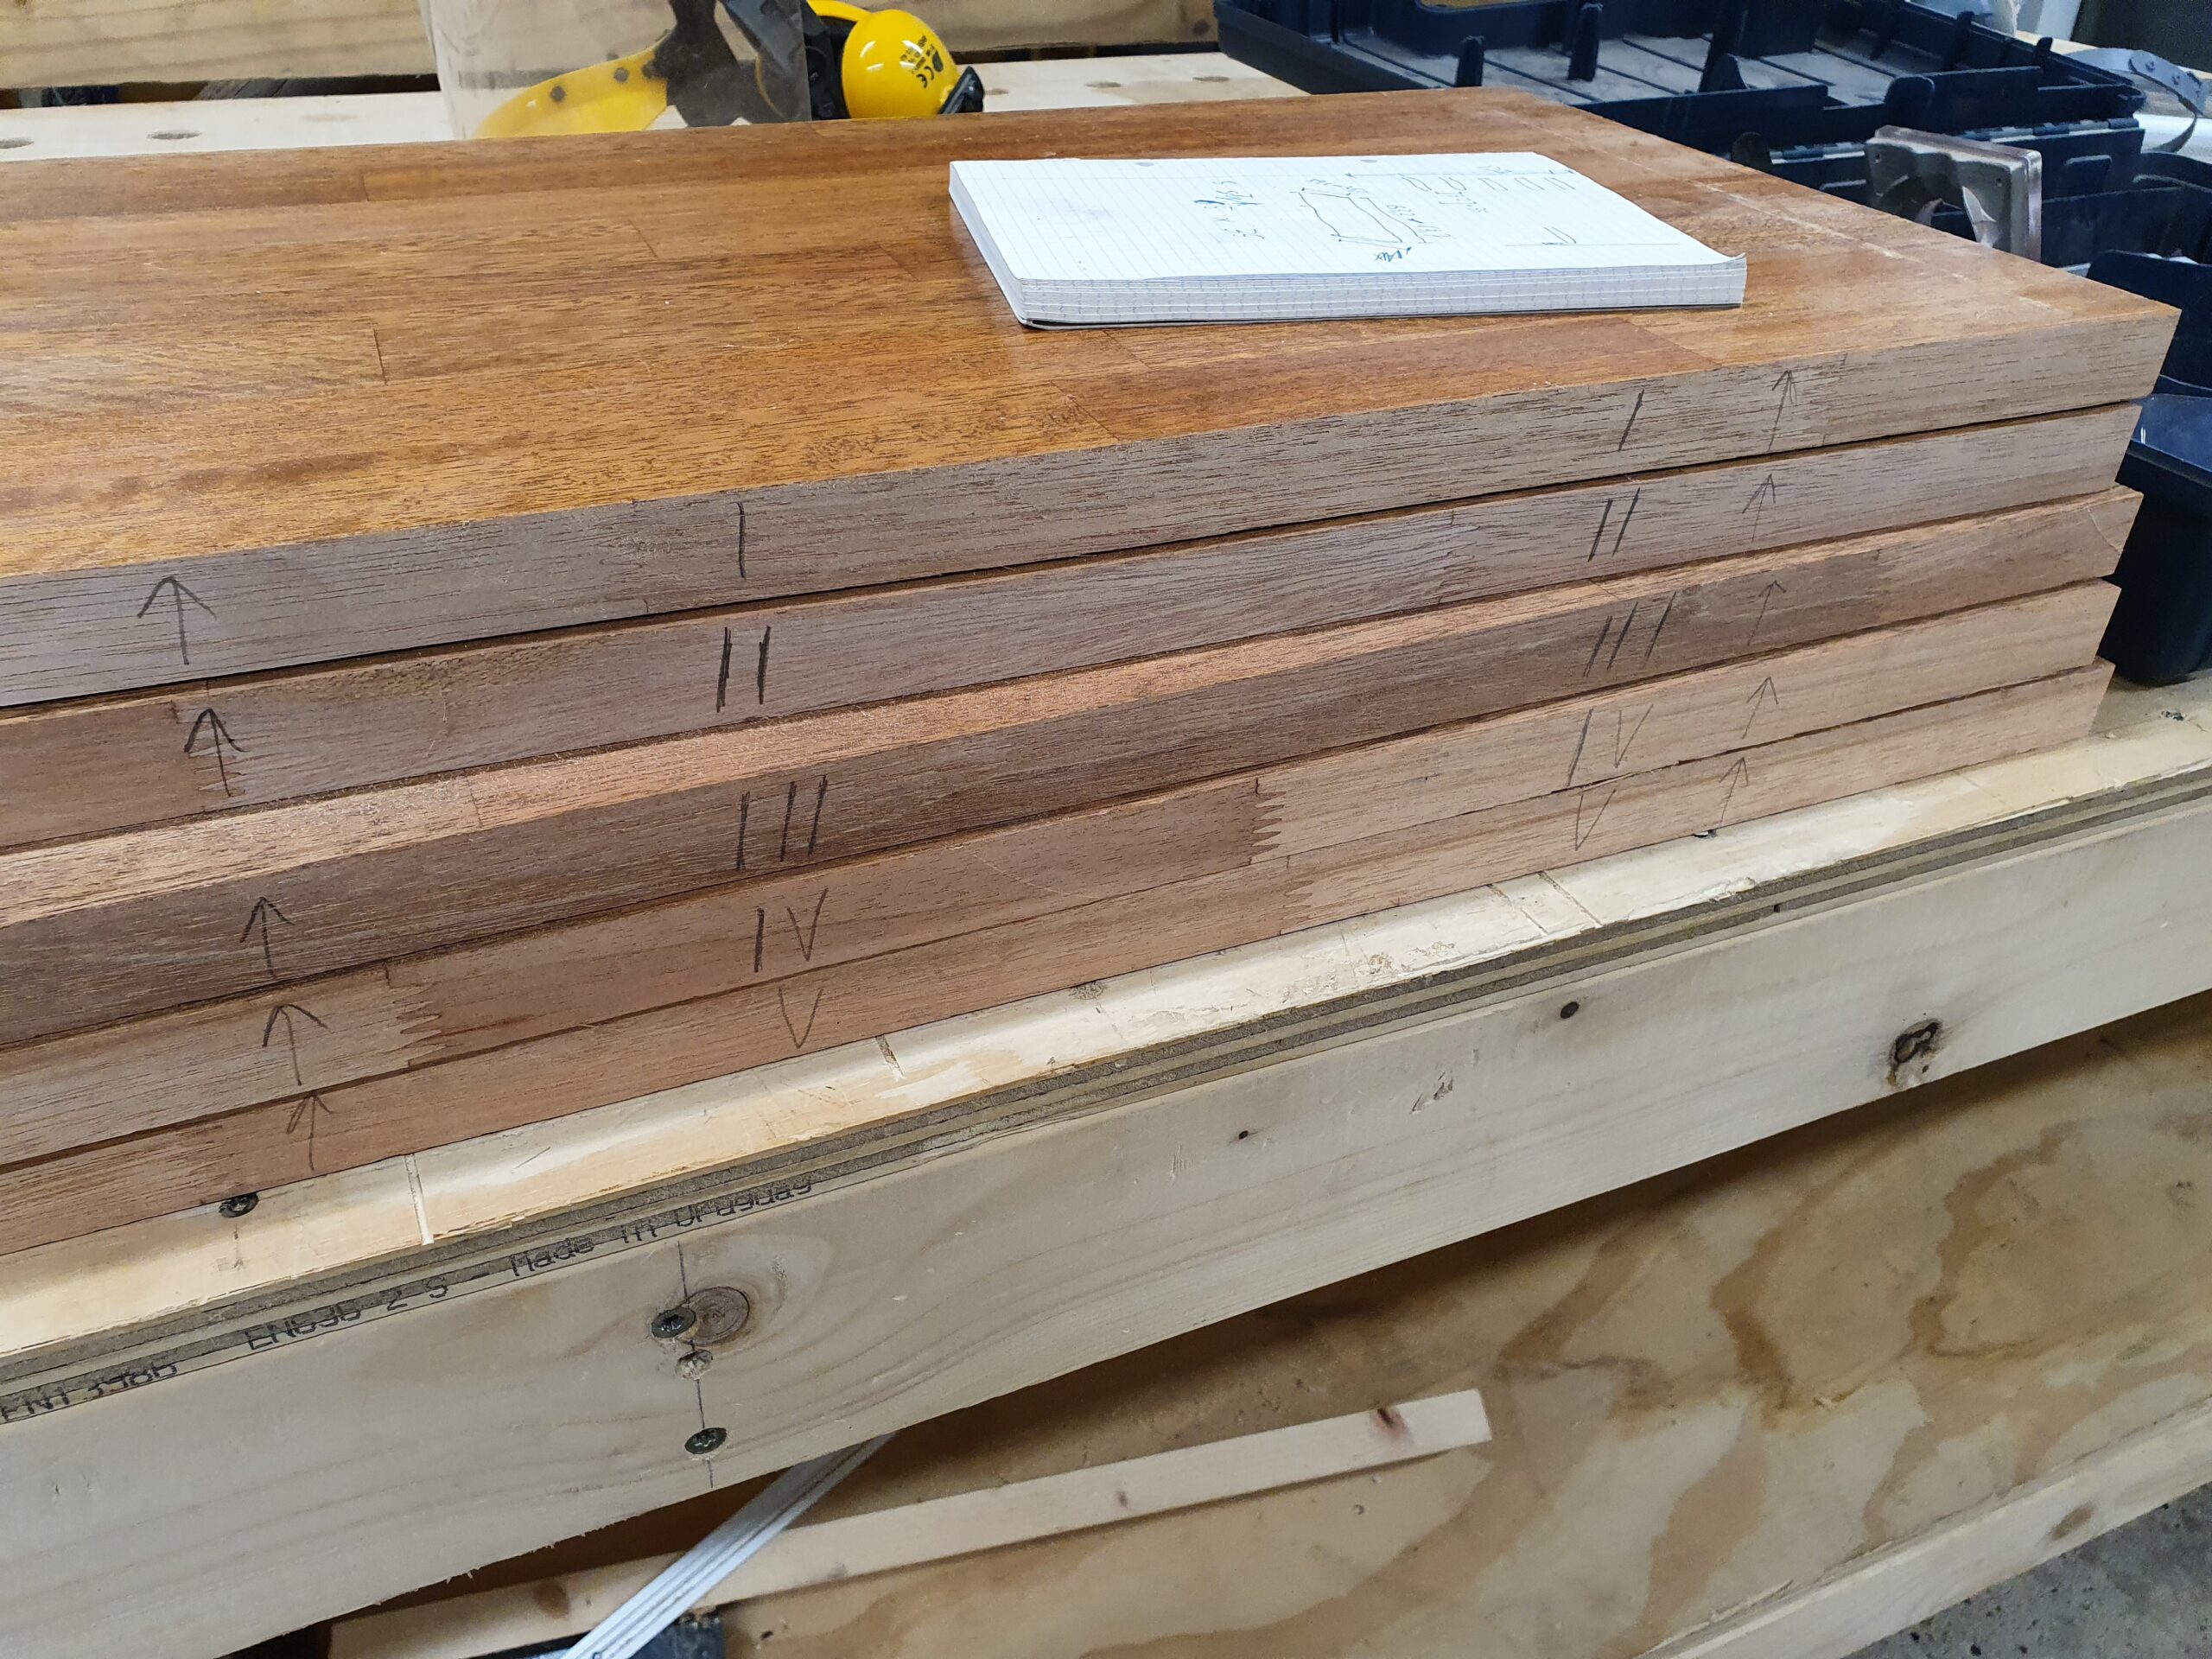
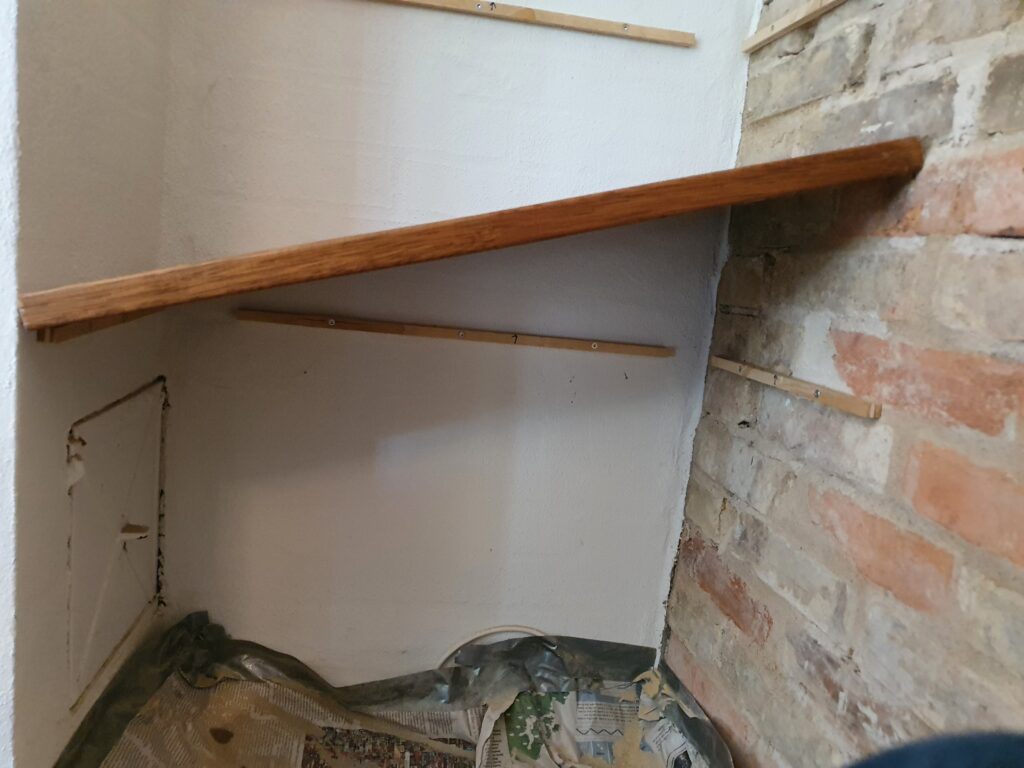
Step 1 was to cut out the rough shelves, with plenty of extra width, and rough fitting the plywood bracket pieces. It makes sense to leave as much on the top of the slit as possible, as this will be the failure point if overloaded. The excellent wood workshop at Hal9k came in very handy!
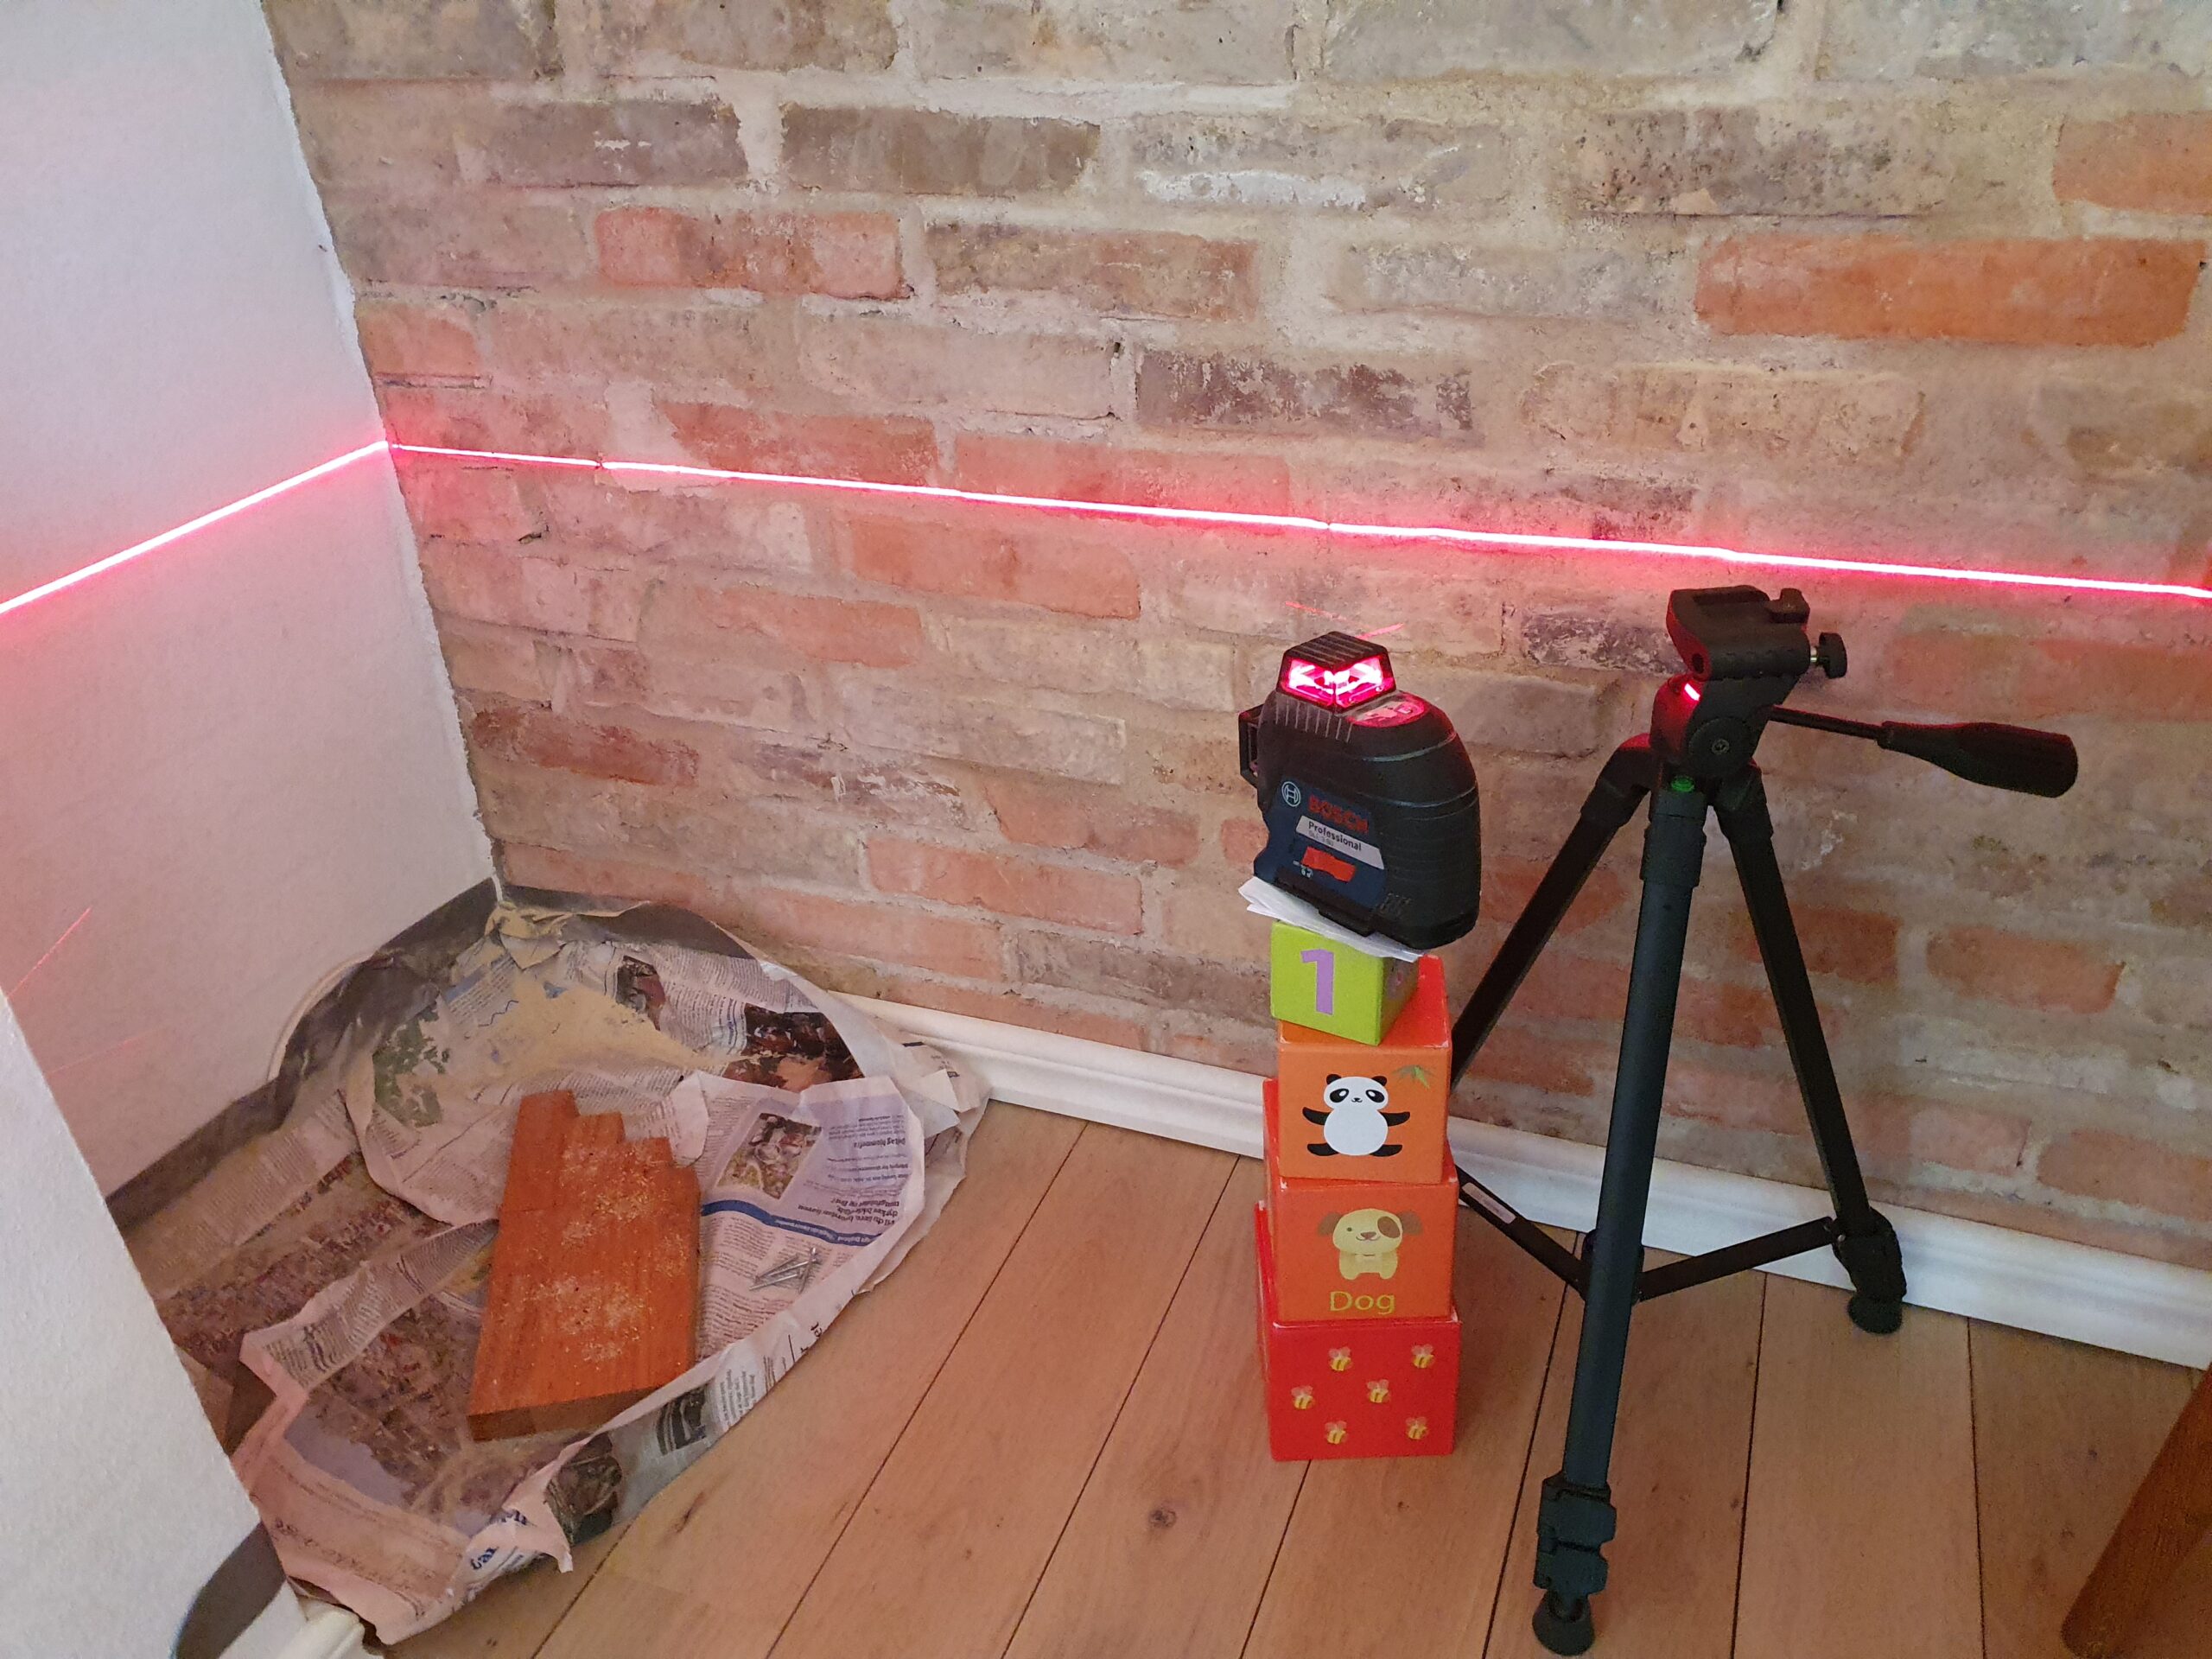
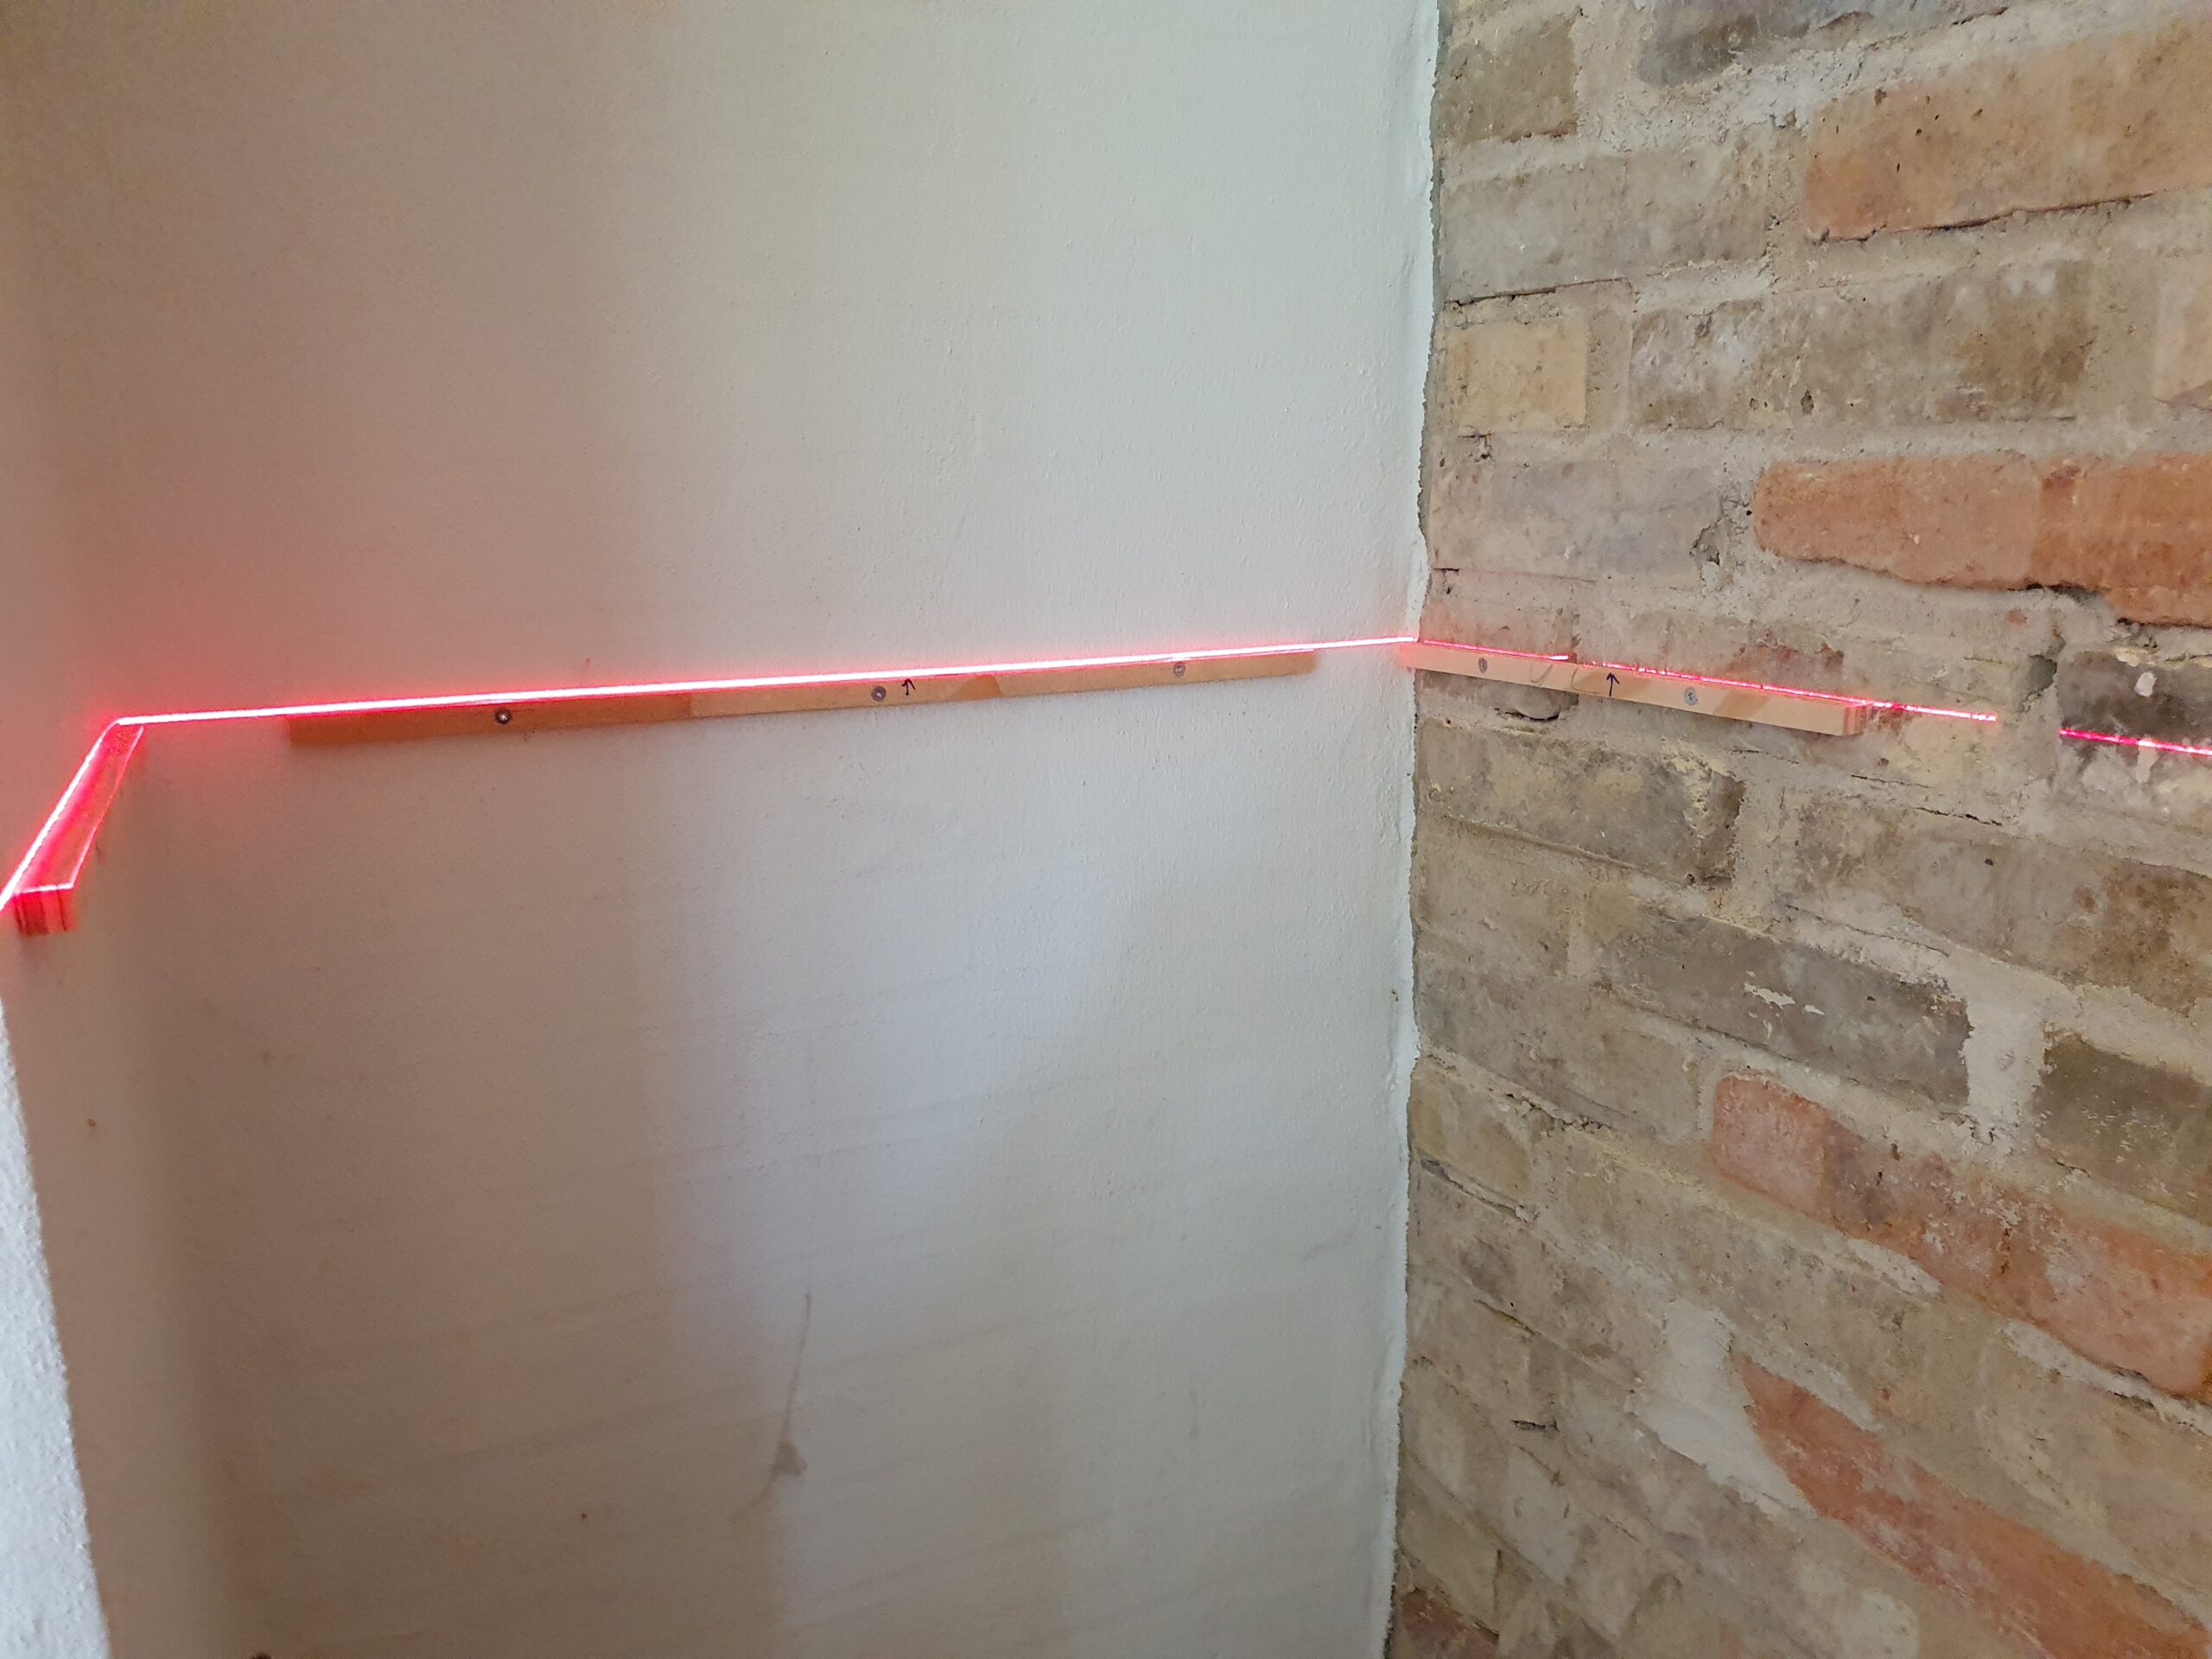
Step 2 was to mount the plywood brackets in the alcove. Pretty easy to do using a laser level, biggest problem was getting the rawplugs in precise enough for the level to be kept.
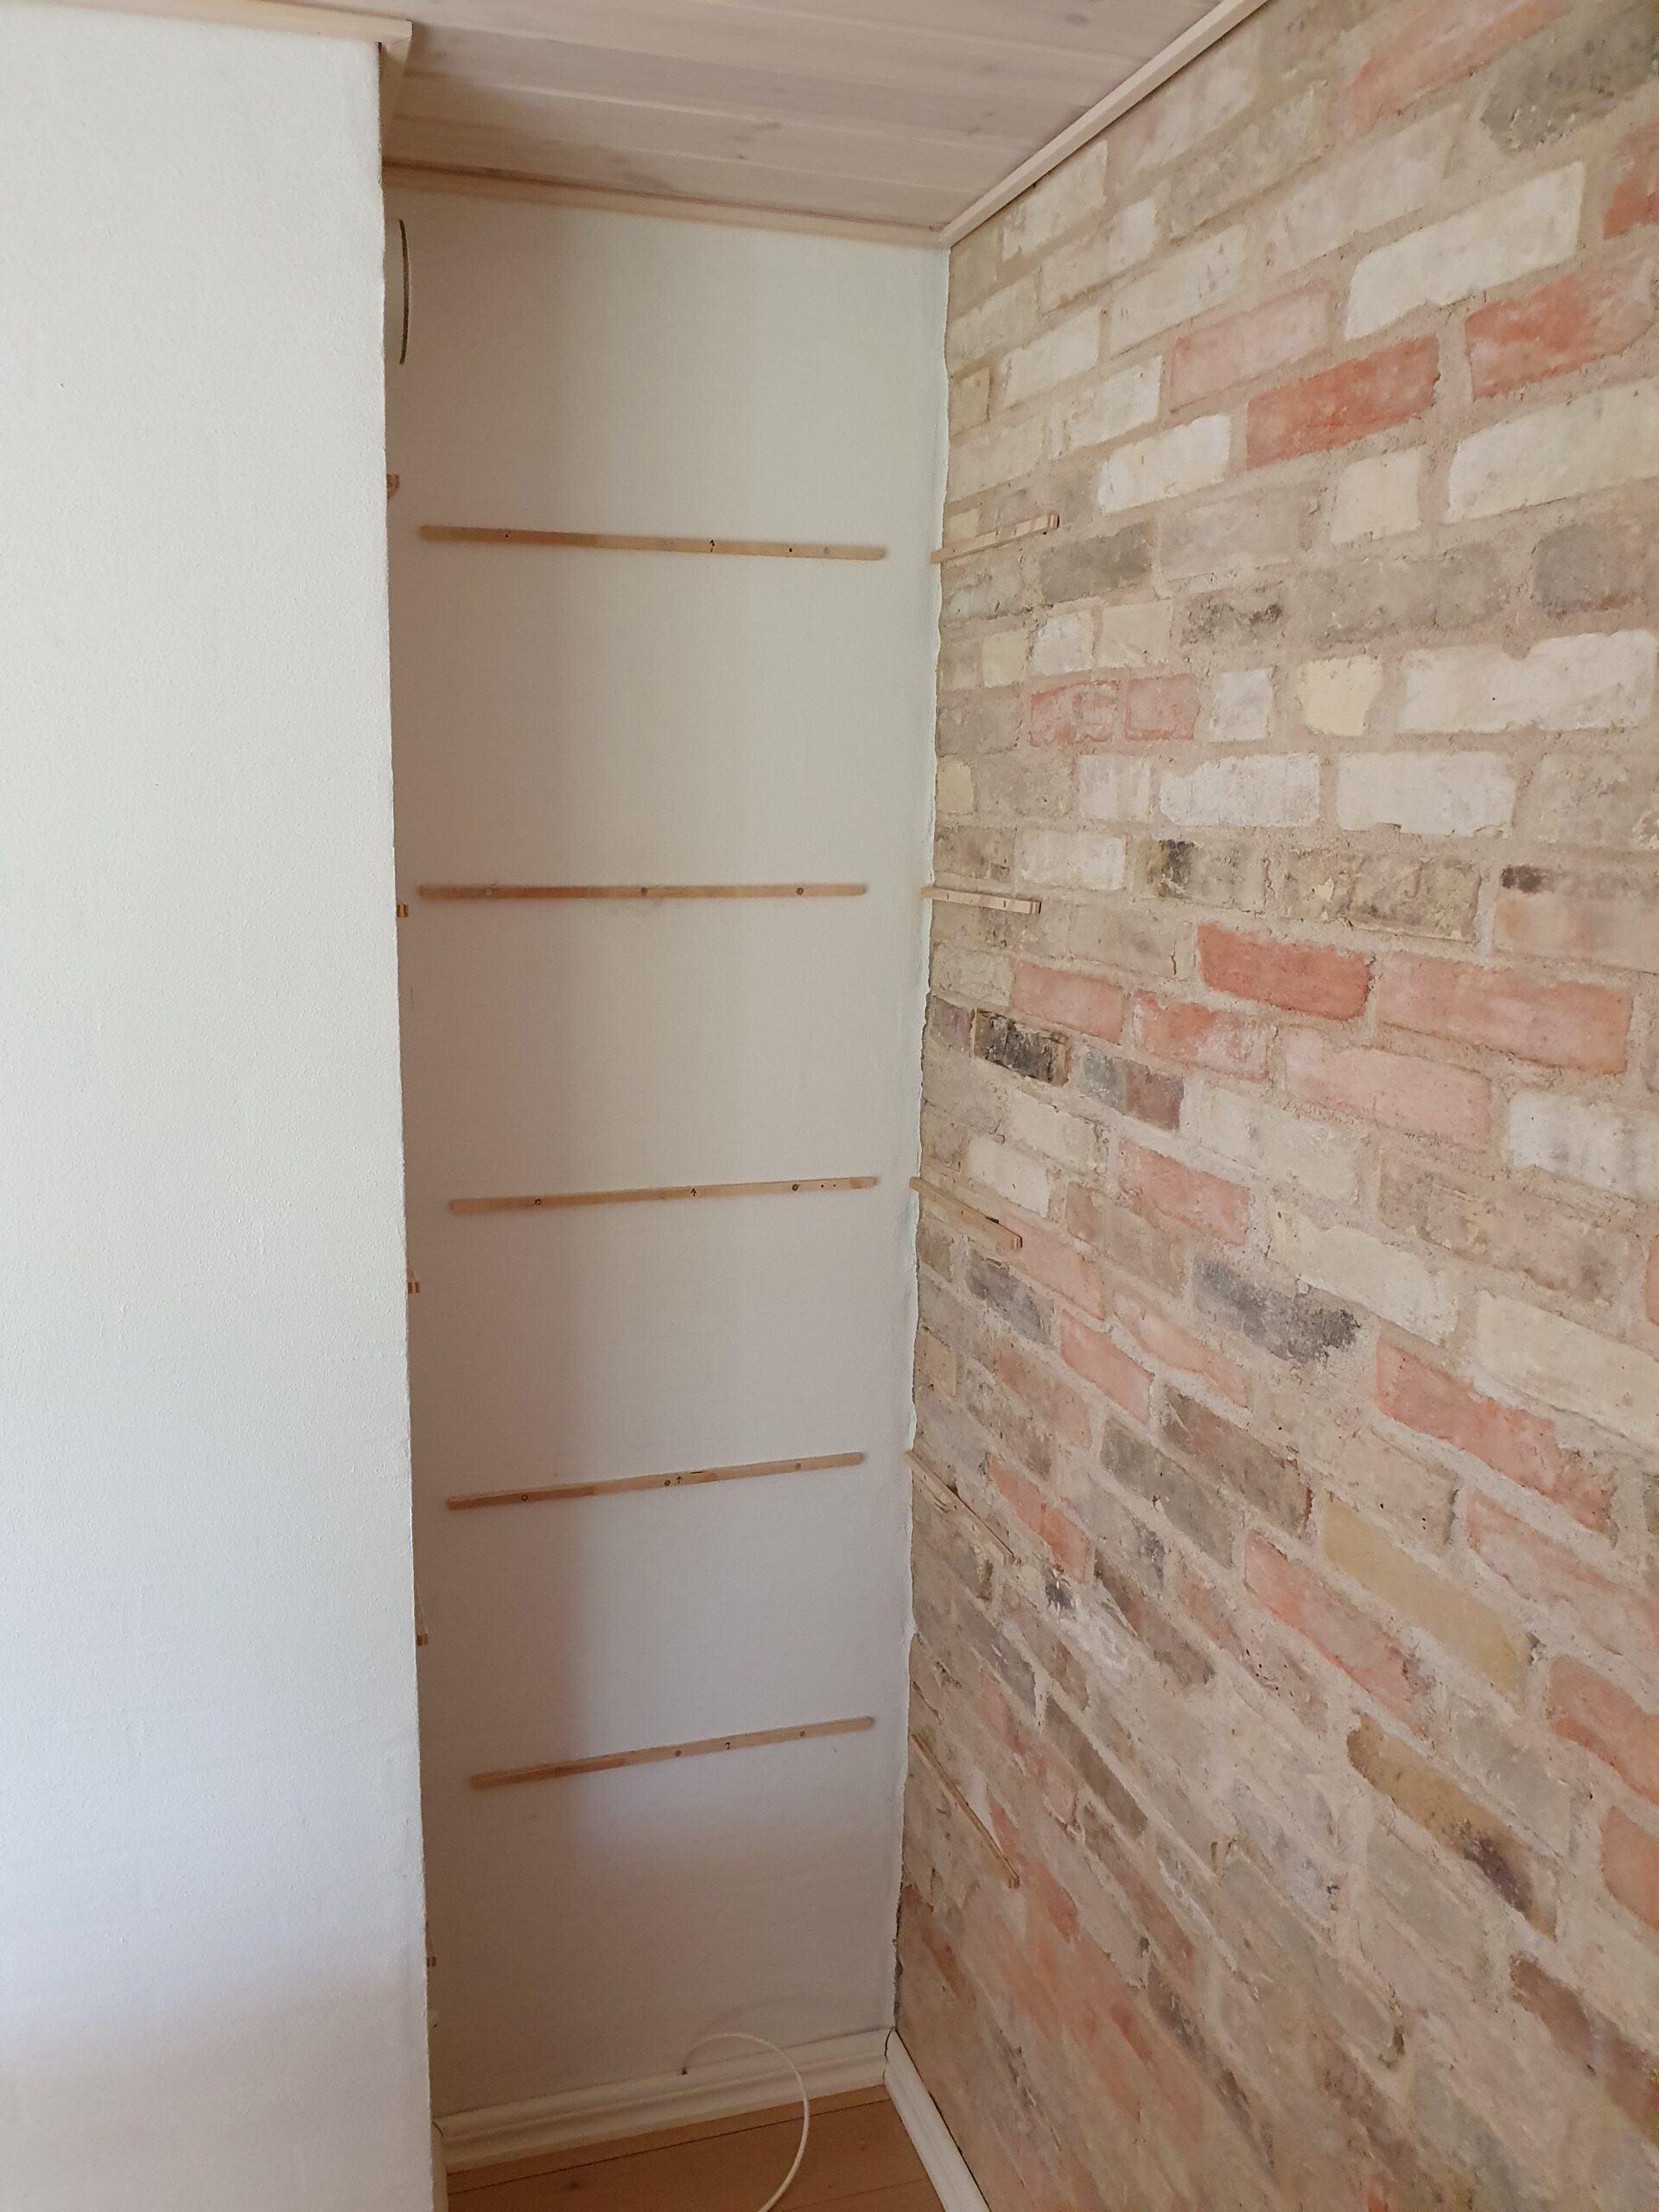
Finally, all the shelves in final mounting. Getting them in took a bit of persuasion with a hammer, and minor adjustments with a knife to the plywood brackets, as it was a tight fit. The key again was small adjustments.
One concern with such a tight fit would be wood movement; however most of the wood movement is “across the grain” which in this application means “in and out” from the alcove, where the wood is basically free to move as the shelves are not fastened to the brackets in any way.
Another concern would be if the relatively small brackets (12x12mm) can handle the load of the relatively wide shelves (60cm wide, 35cm deep, and 2.6cm high). There are two failure scenarios: (i) the wood could split above the slit, (ii) or the bracket could deform or be pulled out. Neither seems likely as (i) applying a static (or even dynamic) load large enough to split the wood seems implausible, even at the weakest point in the middle of the front, and (ii) the tight fit counteracts the brackets ability to be pulled out since pulling out in one side would have the shelf hitting the wall on the opposite side.
All in all a very satisfying project to work on and complete!
The Wemos D1 Mini is an ESP8266 based prototyping board with WiFi connectivity and countless applications. It becomes even more useful in battery-powered applications, where with the proper setup, it can run low-powered for months at a time — or only hours if done incorrectly.
This is the quick and dirty guide to running a Wemos D1 Mini powered by Lithium-Ion batteries: We will be blatantly ignoring several design specifications, so double check everything before using in a critical project. Several things will vary, and since there is plenty of clones of the board some boards will work better than others.
Warning: Lithium-Ion batteries always command healthy respect, due to the energy they store! Do not use bad cells, and do not leave batteries unattended in places where a fire can develop, especially while charging. That being said, the setup given here should be as safe as most other Lithium-Ion battery projects.
Why run off a battery?
You chose a Wemos D1 because you want to do some WiFi connectivity. This narrows down the useful modes from the overwhelming large table of possibilities. The approach will be slightly different depending on why you want to run off a battery. There are 3 main usecases:
Periodically wake up on a timer, do some work, connect to WiFi, and go back to sleep. Here we can utilize the deep sleep mode of the ESP8266, and get lifetimes in months.
Wake up based on an external pin trigger, do some work, connect to WiFi, and go back to sleep. Here we can also utilize deep sleep, and get lifetimes in weeks/months.
React with low latency to an external pin, do some work, and go to sleep while still connected to WiFi. Here we can utilize light sleep, but only get lifetimes in hours/days.
Hardware setup
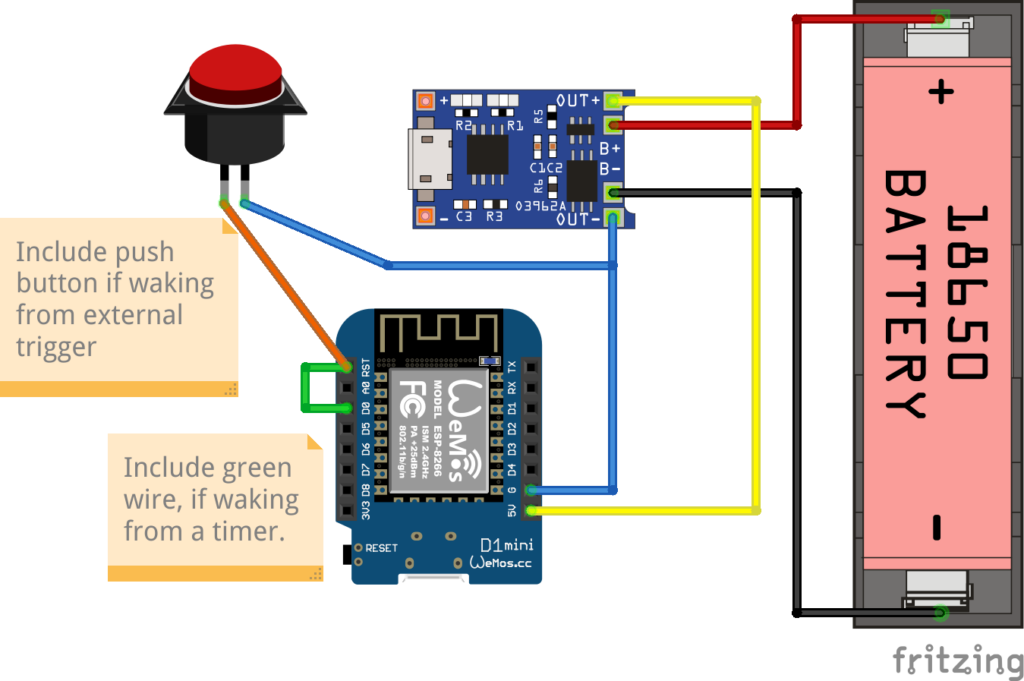
The hardware needed is:
Wemos D1 Mini
TP4056 module with “discharge protection”, most modules with more than one chip has this, but be careful!
Lithium-Ion battery, e.g. a 18650 cell, and probably a holder for the battery
What you don’t want is anything resembling a power bank or battery shield with a regulated output (5V or 3V). These are practically useless, simply a more expensive battery holder! Two reasons: poorly built (I have several where standby is prevented by pulling 100 mA through a resistor!), and you don’t want a switching mode power supply. The keyword here is “quiescent current”: an SMPS can easily consume 5-10 mA continuously, which could very likely be the majority of the current draw.
Keep in mind that after waking from the timer the chip will be reset, meaning no state is available, and WiFi will have to reconnect. Reconnecting to WiFi can be anything from 3–10 seconds or even longer, meaning that will be a delay before the program can resume.
The code is exactly the same as waking on a timer, with one exception:
//Sleep until RESET pin is triggered
ESP.deepSleep(0);
The chip will be effectively Cinderella’ed, sleeping until a RESET is triggered. Same caveats apply: waking up the program is restarted, and reconnecting to WiFi will be a delay.
void setup() {
  ...
  WiFi.setSleepMode(WIFI_LIGHT_SLEEP, 3);  // Automatic Light Sleep
}

void loop() {
  ...
  delay(350); // Any value between 100--500 will work, higher value more power savings
    // but also slower wakeup!
}
Simply delaying will bring power savings — simple and easy!
When awake power consumption is around 75mA. Average power consumption when light sleeping with delay(200) is around 45 mA, with delay(350) and larger is around 30–40mA.
Measuring battery depletion
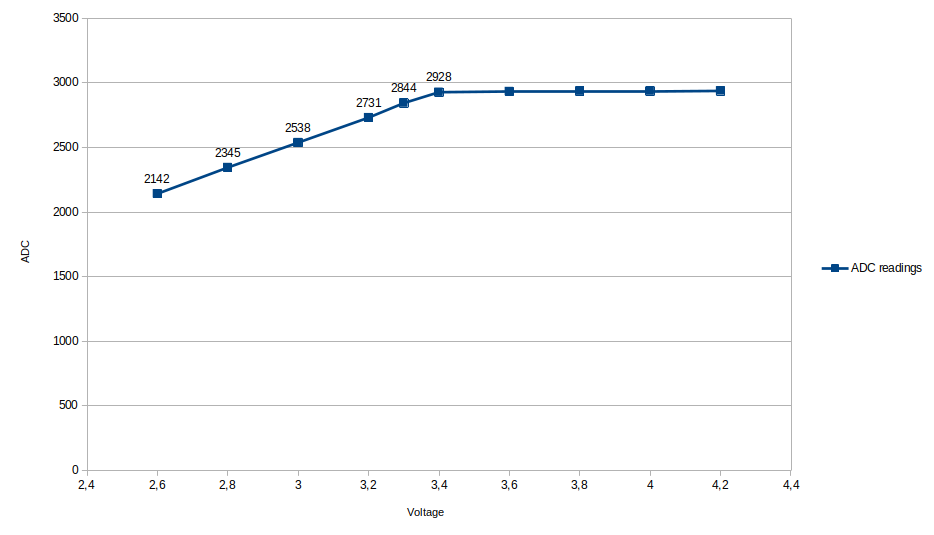
The ESP can measure it’s internal VCC supply voltage, and because the battery will start dropping below the rated 3.3V before it is depleted, this allows to get an warning when the battery starts to deplete.
ADC_MODE(ADC_VCC);

void loop() {
  if (ESP.getVcc() < 2800) {
    //Do something to warn of low battery
  }
}
In my experience the Vcc reading will drop below 2800 when the battery starts to be depleted.
ADC readings vs. battery voltage
Note that measuring the VCC while connected with USB is not possible, as the USB connection will pull up the battery and the 5V rail to 5V!
Calculating battery life
Here is a quick calculator for how long your Wemos D1 Mini can stay powered
Deep sleep
(conservatively assumes base load 1mA, 10 secs burst of 100mA for every wakeup),
resulting in
-
Light sleep
-
Of course the consumption can be brought even lower: some chips are unused but partly connected and will have some leakage (LEDs, USB chip on the Wemos). Making it even leaner is outside the scope of quick and dirty.
Hal9k er Aalborgs hackerspace. Et åbent højteknologisk værksted, hvor man kan lave (næsten) alt. Udover en masse forskellige værksteder, oser Hal9k af viden, kreativitet og varmt socialt fælleskab.
Alle der kommer i vores lokaler risikerer at lære en masse, og ikke mindst få nogle gode oplevelser.
Der er fast klubaften hver torsdag fra kl. 19 til ud på aftenen, hvor alle er velkomne til at kigge forbi!
Privacy & Cookies: This site uses cookies. By continuing to use this website, you agree to their use.
To find out more, including how to control cookies, see here:
Cookie Policy


15 feb
0 Comments