Kategori Extern

20 feb

0 Comments

Floating Solid Wood Alcove Shelves

Af

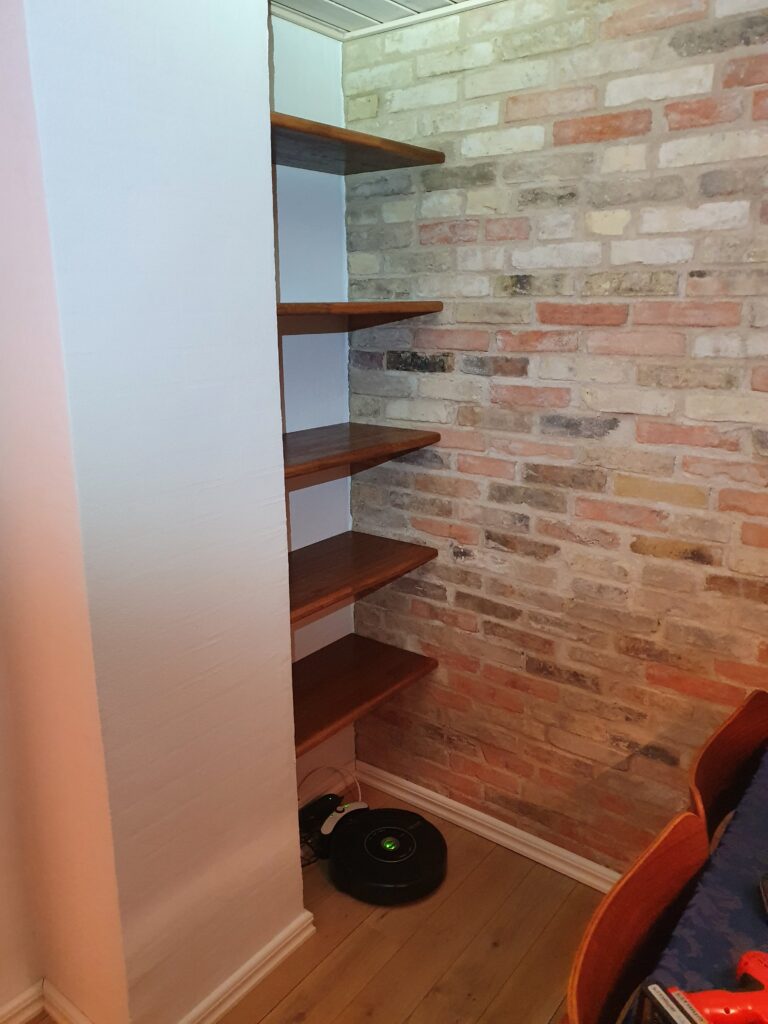
I have an alcove where I wanted to put in some floating shelves. I wanted to use some solid wood I had lying around, to match the rest of the interior; this ruled out most of the methods described online: (i) building up the shelf around a bracket, and (ii) using hidden mounting hardware would be hard to get precise and would not provide support on the sides.

So inspired by some of the options instead I tried to get by with just brackets on the three sides, in a solid wood shelf. I ended up with 12mm brackets of plywood in a 26mm solid wood shelf, and that was plenty sturdy.

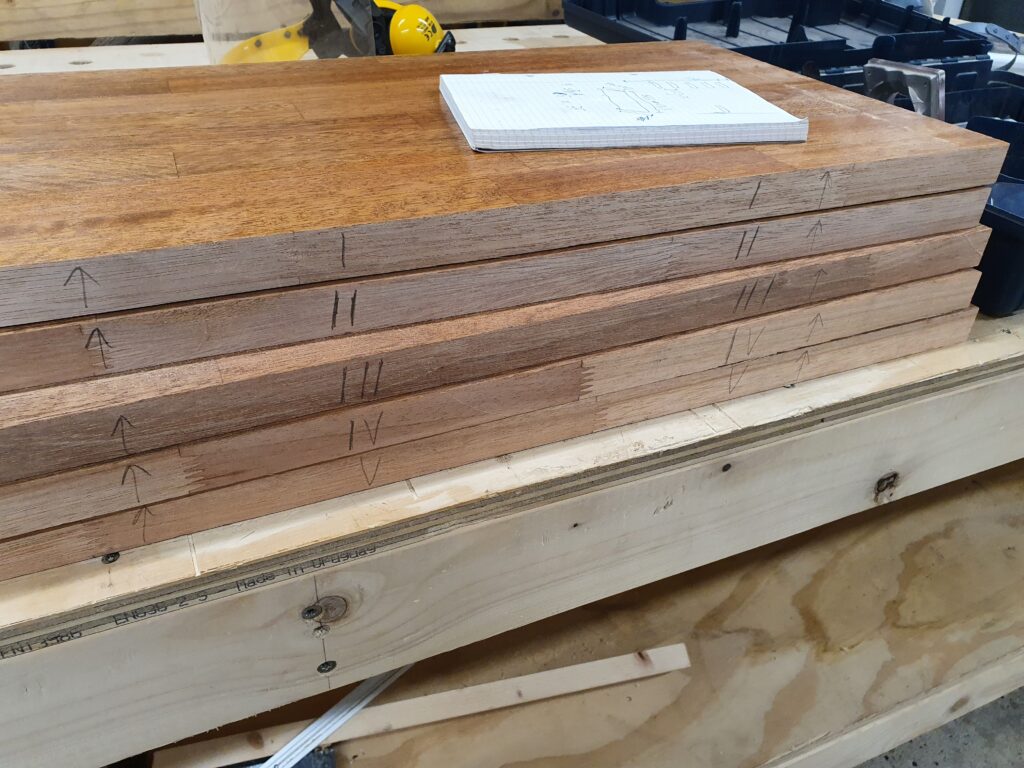
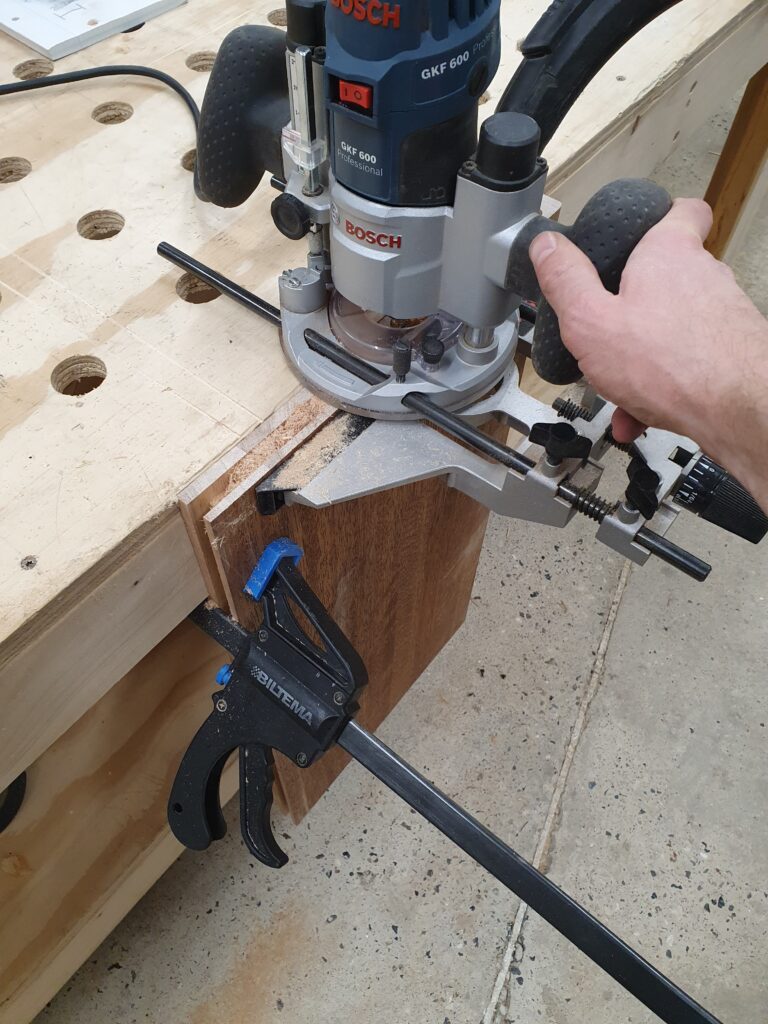
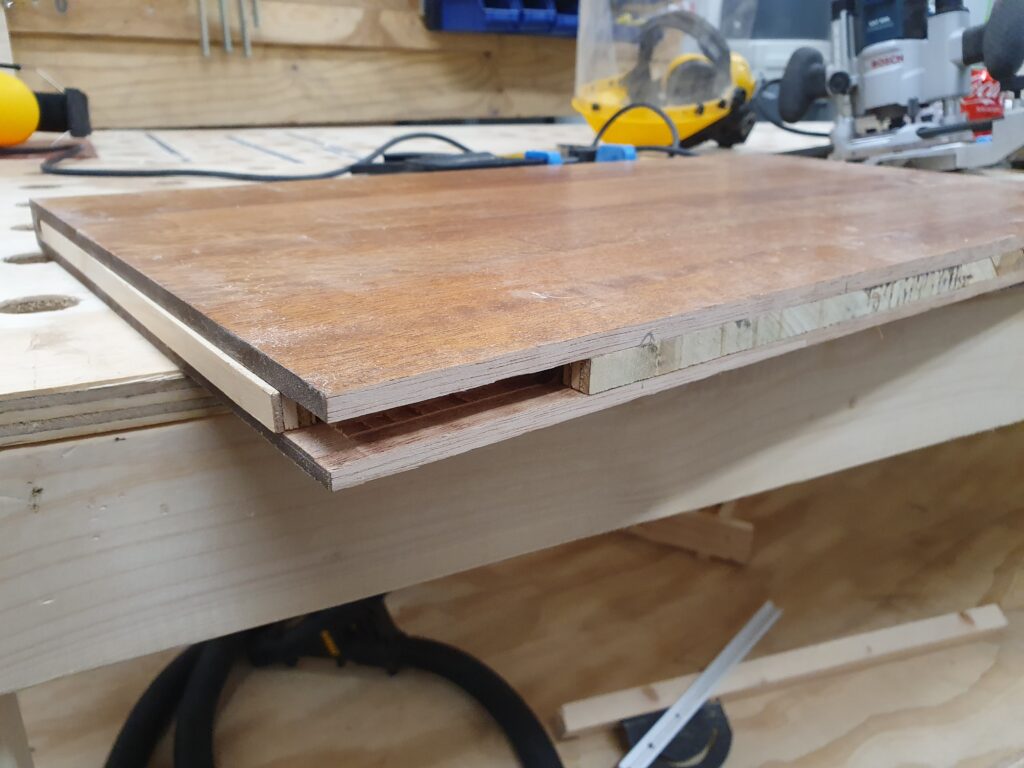
Step 1 was to cut out the rough shelves, with plenty of extra width, and rough fitting the plywood bracket pieces. It makes sense to leave as much on the top of the slit as possible, as this will be the failure point if overloaded. The excellent wood workshop at Hal9k came in very handy!

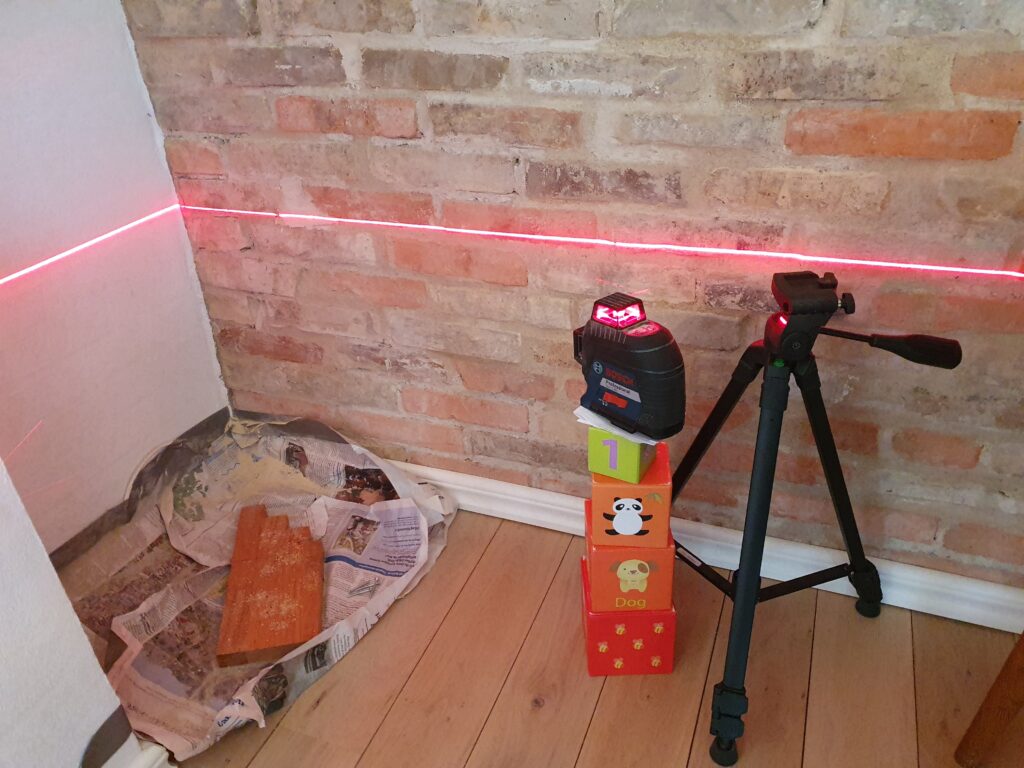
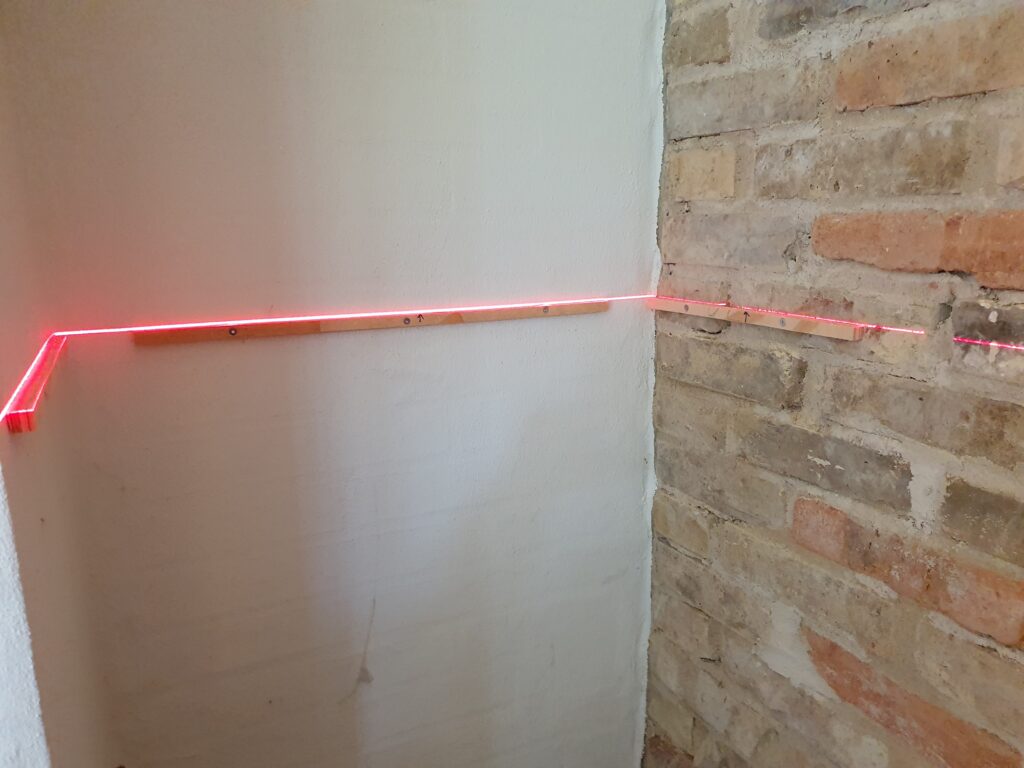
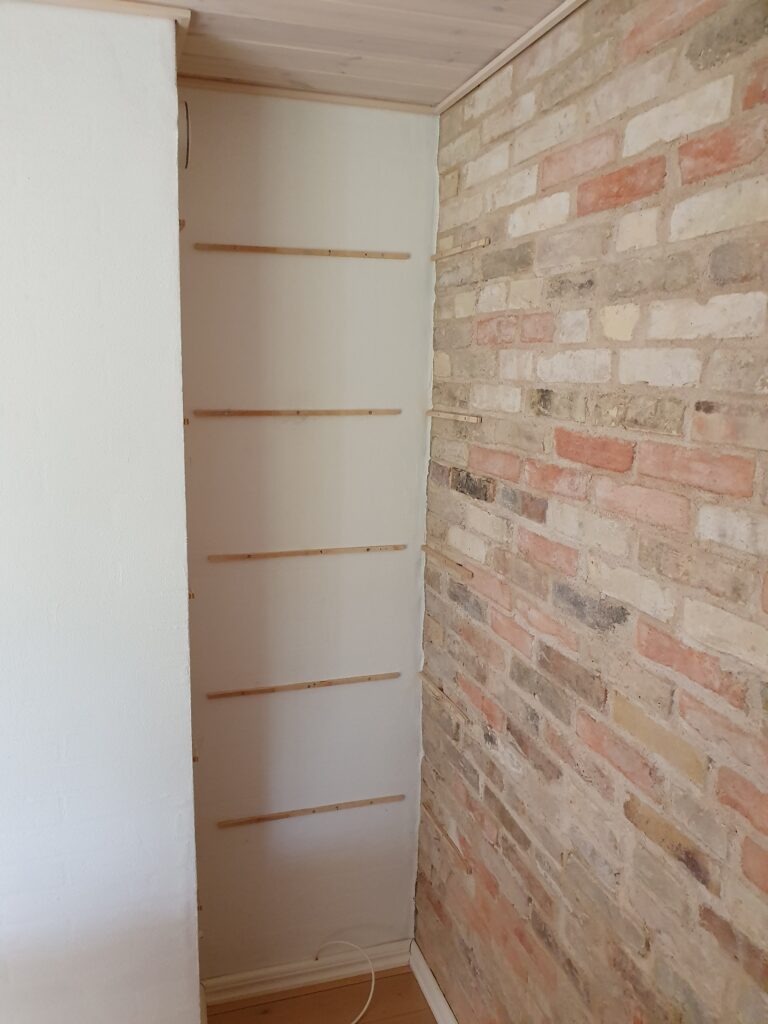
Step 2 was to mount the plywood brackets in the alcove. Pretty easy to do using a laser level, biggest problem was getting the rawplugs in precise enough for the level to be kept.

Step 3 was fitting the shelves individually, accounting for the crookedness of the 3 walls. The scribing method used by Rag’n’Bone Brown was pretty useful, just doing it in multiple steps to make sure not to cut off too much.

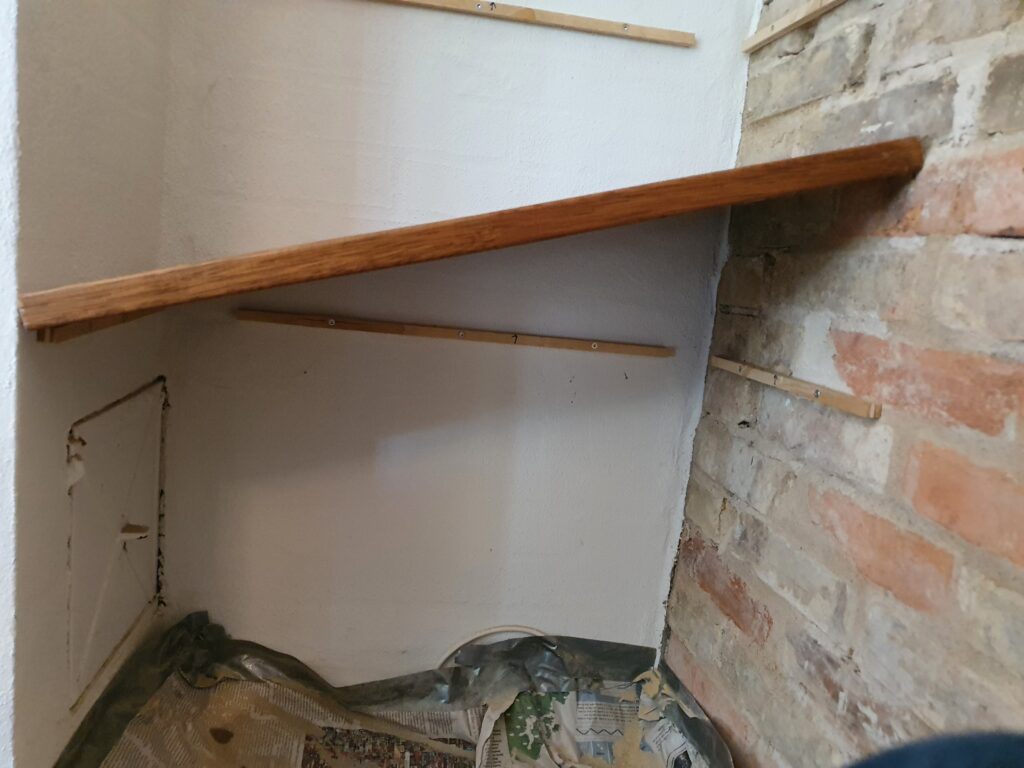
Finally, all the shelves in final mounting. Getting them in took a bit of persuasion with a hammer, and minor adjustments with a knife to the plywood brackets, as it was a tight fit. The key again was small adjustments.

One concern with such a tight fit would be wood movement; however most of the wood movement is “across the grain” which in this application means “in and out” from the alcove, where the wood is basically free to move as the shelves are not fastened to the brackets in any way.

Another concern would be if the relatively small brackets (12x12mm) can handle the load of the relatively wide shelves (60cm wide, 35cm deep, and 2.6cm high). There are two failure scenarios: (i) the wood could split above the slit, (ii) or the bracket could deform or be pulled out. Neither seems likely as (i) applying a static (or even dynamic) load large enough to split the wood seems implausible, even at the weakest point in the middle of the front, and (ii) the tight fit counteracts the brackets ability to be pulled out since pulling out in one side would have the shelf hitting the wall on the opposite side.

All in all a very satisfying project to work on and complete!

Gemt under: Extern, HAL9k

Tags: ,

15 dec

0 Comments

Quick and dirty Lithium battery-powered Wemos D1 Mini

Af

The Wemos D1 Mini is an ESP8266 based prototyping board with WiFi connectivity and countless applications. It becomes even more useful in battery-powered applications, where with the proper setup, it can run low-powered for months at a time — or only hours if done incorrectly.

This is the quick and dirty guide to running a Wemos D1 Mini powered by Lithium-Ion batteries: We will be blatantly ignoring several design specifications, so double check everything before using in a critical project. Several things will vary, and since there is plenty of clones of the board some boards will work better than others.

Warning: Lithium-Ion batteries always command healthy respect, due to the energy they store! Do not use bad cells, and do not leave batteries unattended in places where a fire can develop, especially while charging. That being said, the setup given here should be as safe as most other Lithium-Ion battery projects.

Why run off a battery?

You chose a Wemos D1 because you want to do some WiFi connectivity. This narrows down the useful modes from the overwhelming large table of possibilities. The approach will be slightly different depending on why you want to run off a battery. There are 3 main usecases:

  • Periodically wake up on a timer, do some work, connect to WiFi, and go back to sleep. Here we can utilize the deep sleep mode of the ESP8266, and get lifetimes in months.
  • Wake up based on an external pin trigger, do some work, connect to WiFi, and go back to sleep. Here we can also utilize deep sleep, and get lifetimes in weeks/months.
  • React with low latency to an external pin, do some work, and go to sleep while still connected to WiFi. Here we can utilize light sleep, but only get lifetimes in hours/days.

Hardware setup

The hardware needed is:

  • Wemos D1 Mini
  • TP4056 module with “discharge protection”, most modules with more than one chip has this, but be careful!
  • Lithium-Ion battery, e.g. a 18650 cell, and probably a holder for the battery

What you don’t want is anything resembling a power bank or battery shield with a regulated output (5V or 3V). These are practically useless, simply a more expensive battery holder! Two reasons: poorly built (I have several where standby is prevented by pulling 100 mA through a resistor!), and you don’t want a switching mode power supply. The keyword here is “quiescent current”: an SMPS can easily consume 5-10 mA continuously, which could very likely be the majority of the current draw.

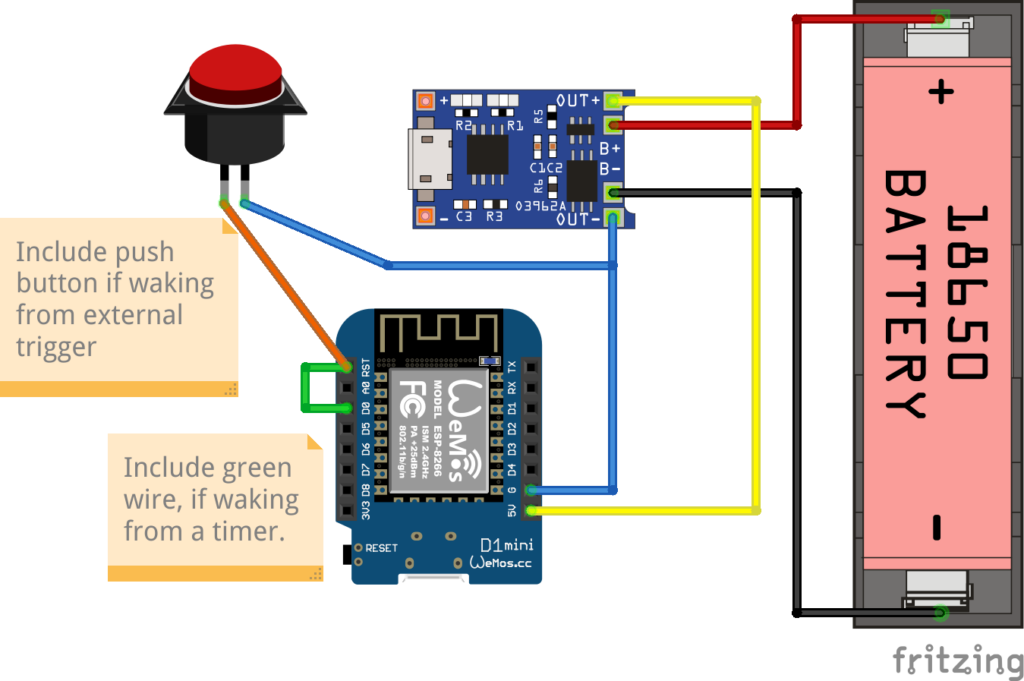
Wiring diagram.

Waking on a timer – deep sleep

Full code example for deep sleeping on a timer.

To start deep sleep for a specified period of time:

//Sleep for some time; when waking everything will be reset and setup() will run again
ESP.deepSleep(30 * MICROSECONDS_PER_SEC);

Note that you can’t safely sleep for more than approximately 3 hours. Power usage is approx 0.3–0.4mA when deep sleeping.

Keep in mind that after waking from the timer the chip will be reset, meaning no state is available, and WiFi will have to reconnect. Reconnecting to WiFi can be anything from 3–10 seconds or even longer, meaning that will be a delay before the program can resume.

Waking on an pin trigger (reset)

Full code example for deep sleeping waiting for a pin trigger.

The code is exactly the same as waking on a timer, with one exception:

//Sleep until RESET pin is triggered
ESP.deepSleep(0);

The chip will be effectively Cinderella’ed, sleeping until a RESET is triggered. Same caveats apply: waking up the program is restarted, and reconnecting to WiFi will be a delay.

Stay connected – low latency

Full code example for light sleeping connected to WiFi waiting for a pin trigger. Note that the button should be connected to D3 for this example, not RST.

The key parts are:

void setup() {
  ...
  WiFi.setSleepMode(WIFI_LIGHT_SLEEP, 3);  // Automatic Light Sleep
}

void loop() {
  ...
  delay(350); // Any value between 100--500 will work, higher value more power savings
    // but also slower wakeup!
}

Simply delaying will bring power savings — simple and easy!

When awake power consumption is around 75mA. Average power consumption when light sleeping with delay(200) is around 45 mA, with delay(350) and larger is around 30–40mA.

Measuring battery depletion

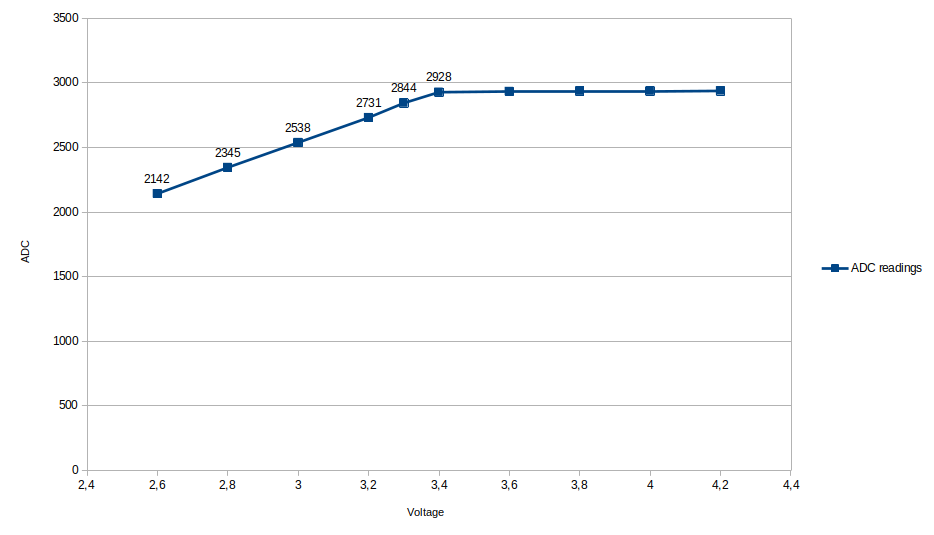
The ESP can measure it’s internal VCC supply voltage, and because the battery will start dropping below the rated 3.3V before it is depleted, this allows to get an warning when the battery starts to deplete.

ADC_MODE(ADC_VCC);

void loop() {
  if (ESP.getVcc() < 2800) {
    //Do something to warn of low battery
  }
}

In my experience the Vcc reading will drop below 2800 when the battery starts to be depleted.

ADC readings vs. battery voltage

Note that measuring the VCC while connected with USB is not possible, as the USB connection will pull up the battery and the 5V rail to 5V!

Calculating battery life

Here is a quick calculator for how long your Wemos D1 Mini can stay powered


Deep sleep


(conservatively assumes base load 1mA, 10 secs burst of 100mA for every wakeup), resulting in

-

Light sleep


-

Of course the consumption can be brought even lower: some chips are unused but partly connected and will have some leakage (LEDs, USB chip on the Wemos). Making it even leaner is outside the scope of quick and dirty.

Gemt under: Extern, HAL9k

04 okt

0 Comments

Olimex A20-OLinuXino-LIME2 – 8 years in service, 2 PSUs and 1 SD-card down

Af

4 years ago I posted a 4 year review of the Olimex LIME2. It seems that the lifetime of power supplies is approximately 4 years as now another power supply died, and this time also the SD-card was expiring. The LIME2 lives on however!

It was a bit hard to notice, because the battery pack of the LIME2 kept it running pretty well even with the poor power supply. So, better monitoring of the battery pack is also on the todo list.

Recovering the bad SD-card

Recovering the SD-card was relatively easy with minimal dataloss, when out of the LIME2:

$ sudo ddrescue /dev/mmcblk0 backup.img
# Put in a new SD-card
$ sudo dd if=backup.img of=/dev/mmcblk0 bs=16M

I have done this a couple of times with other SD-cards from Raspberry PIs, and though there is the potential for dataloss it is usually minimal. This time a few blocks were lost.

Upgrading Debian from Stretch to Bullseye

I took the opportunity to upgrade the Debian install while the system was offline anyway. Upgrading was generally painless, following the usual Debian method. I went through the Buster release just to be sure:

$ vim /etc/apt/sources.list
# replace all "stretch" with "buster" :%s/stretch/buster
$ apt update && apt upgrade && apt full-upgrade
$ reboot

$ vim /etc/apt/sources.list
# replace all "buster" with "bullseye" :%s/buster/bullseye
$ apt update && apt upgrade && apt full-upgrade
$ reboot

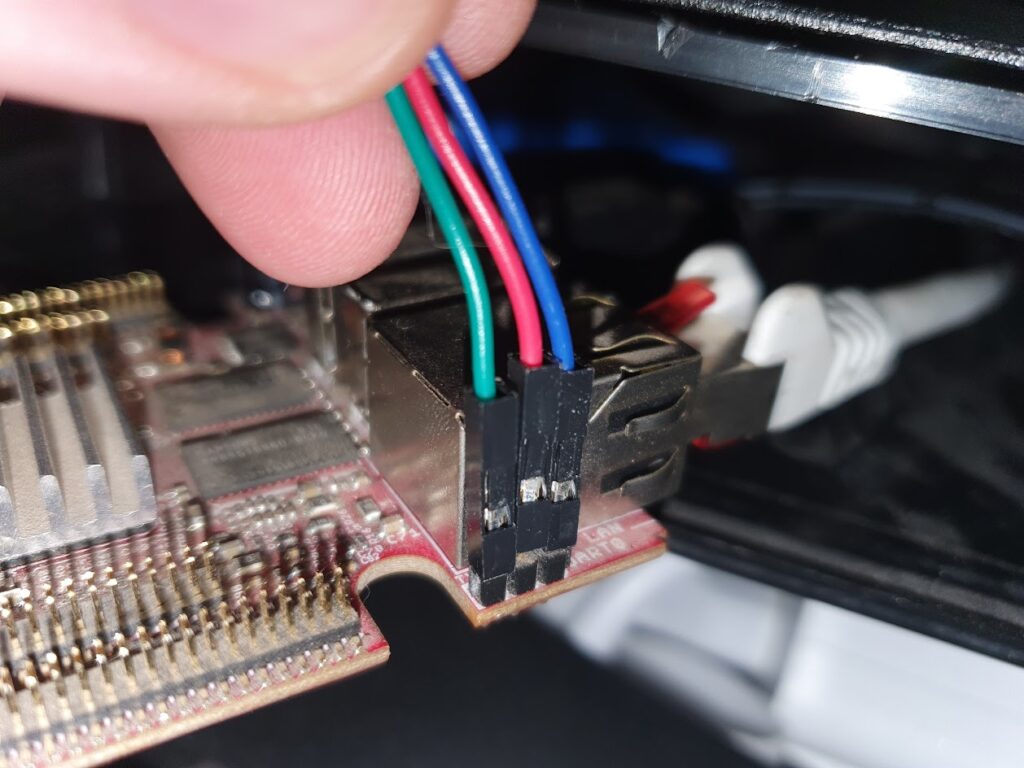
The only tricky part is booting the new kernel. Since that always fails for me on the first try, I always hookup the serial console. For future reference, this is how to hookup the serial console:

Pinout from left as labelled on the LIME2: TX, RX, GND

Now, of course the boot failed. I tried getting the flash-kernel package to work for my setup, but for historical reasons I have a separate boot partition. In the end I derived a simple bootscript from that package, that boots from p1 but loads the kernel, fdt and initrd from p2:

setenv bootargs  ${bootargs} console=ttyS0,115200 root=/dev/mmcblk0p2 rootwait panic=10

#setenv fk_kvers '4.19.0-21-armmp-lpae'
setenv fk_kvers '5.10.0-18-armmp-lpae'
setenv fdtpath dtb-${fk_kvers}

load mmc 0:2 ${kernel_addr_r} /boot/vmlinuz-${fk_kvers}
load mmc 0:2 ${fdt_addr_r} /boot/${fdtpath}
load mmc 0:2 ${ramdisk_addr_r} /boot/initrd.img-${fk_kvers}
bootz ${kernel_addr_r} ${ramdisk_addr_r}:${filesize} ${fdt_addr_r}

The script can be manually input over the serial terminal, and thereby tested out.

The only downside is it needs to be manually updated after each kernel upgrade. To activate the uboot bootscript:

$ mount /dev/mmcblk0p1 /mnt/
$ cd /mnt
# ensure boot.cmd is as above
$ mkimage -C none -A arm -T script -d boot.cmd boot.scr

Monitoring the LIME2 battery pack

After upgrading to a recent 5.X mainline Linux kernel the battery pack is exposed in the sysfs filesystem:

$ cat /sys/class/power_supply/axp20x-battery/voltage_now 
4070000 # 4.07 V
$ cat /sys/class/power_supply/axp20x-ac/voltage_now 
4933000 # 4.93 V

I setup a couple of alerting rules for these in my home monitoring setup, so hopefully the next time the LIME2 defeats a power supply I’ll get notified.

Conclusion

I can still warmly recommend the LIME2. It is still available, and even a bit cheaper nowadays at 40 EUR + VAT, and still a little workhorse that just keeps on going.

Gemt under: Extern, HAL9k

Tags: ,

29 aug

3 Comments

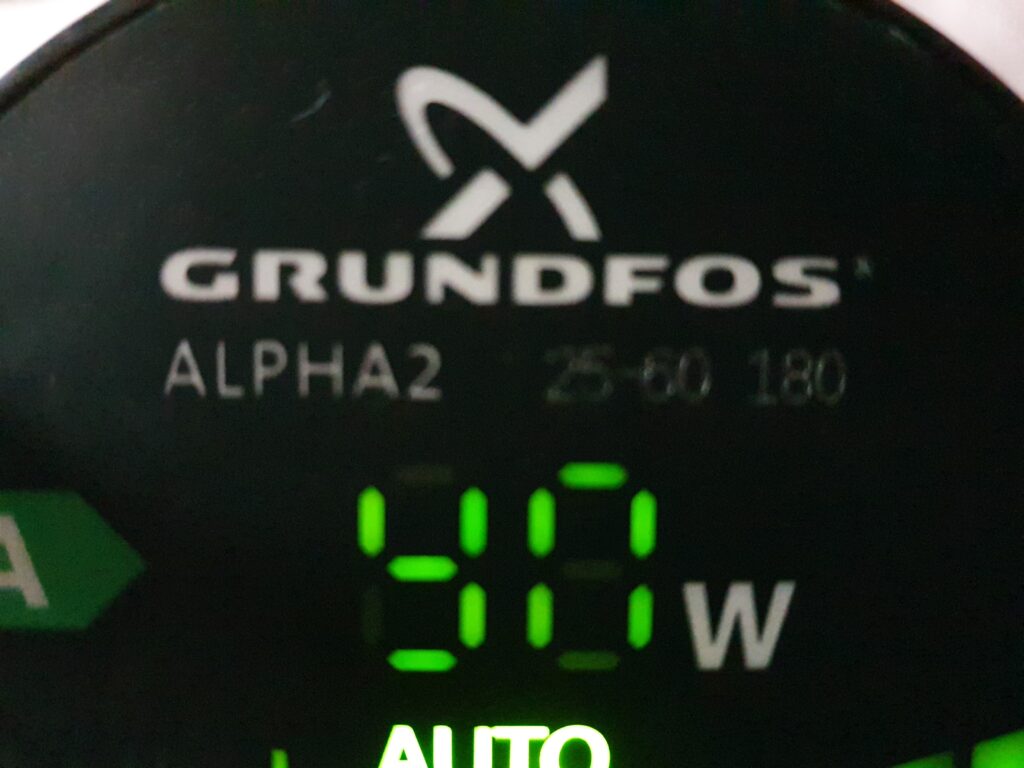
Grundfos Alpha 2 pumpe går i stykker og flimrer: reparer den med en kondensator til nogle få kr

Af

Som med så mange andre huse fulgte der en Grundfos Alpha 2 cirkulationspumpe med da vi købte et hus. Den pumpede og pumpede, indtil den var blevet 13 år gammel: så begyndte den at flimre når den skulle starte op. Det er jo som sådan en rimelig hæderlig levetid, men også lidt mistænkeligt at det ikke virkede til at være et mekanisk problem.

Flimmer, men ingen pumpning.

Symptomerne er:

  • Pumpen kan køre fint i længere tid
  • Ved længere tids stop kan den ikke starte; nogen gange starter den efter noget tid
  • Ved opvarmning starter pumpen, f.x. med en varmepistol

Det sidste punkt har gjort at der flere steder bliver spekuleret i at der er “kondens” i pumpen.

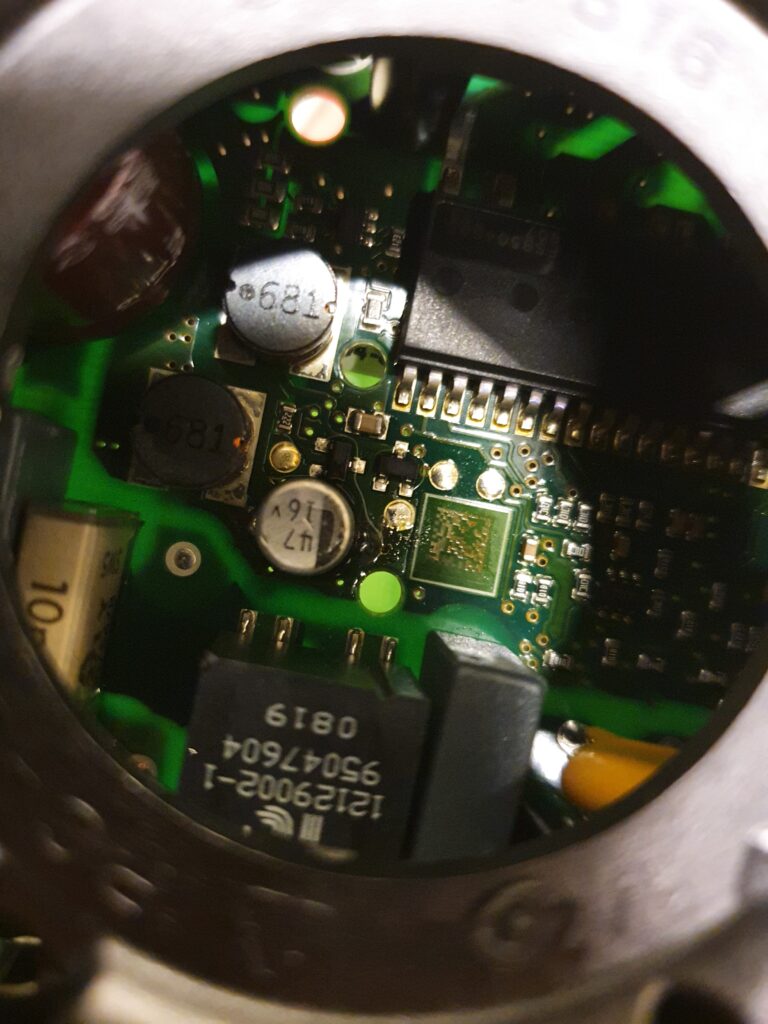
Det er dog ikke problemet. Problemet er en lille kondensator der holder strøm til lavspændingselektronikken:

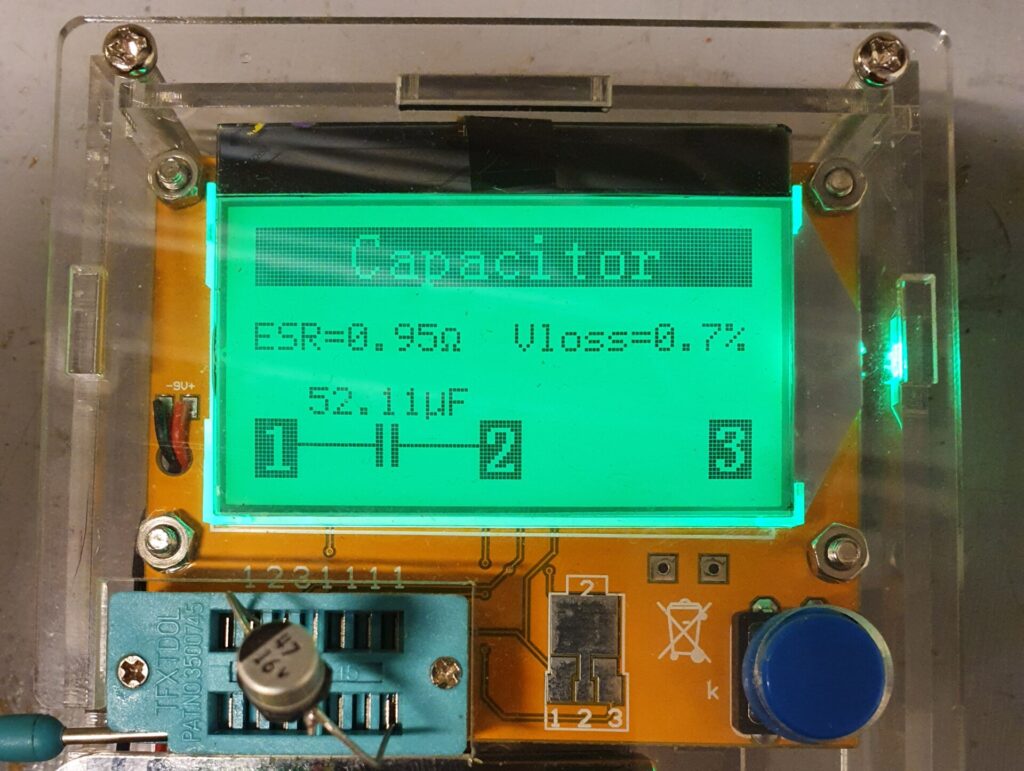
47 uF 16 V kondensatoren er problemet.

I Hal9k eksperimenterede vi en smule for at verificere: hvis man køler den ned med f.x. sprit opstår problemet med det samme. Hvis man varmer den op starter pumpen med det samme.

For en udførlig vejledning i hvordan pumpen skilles ad og kondensatoren skiftes har Simon lavet en video:

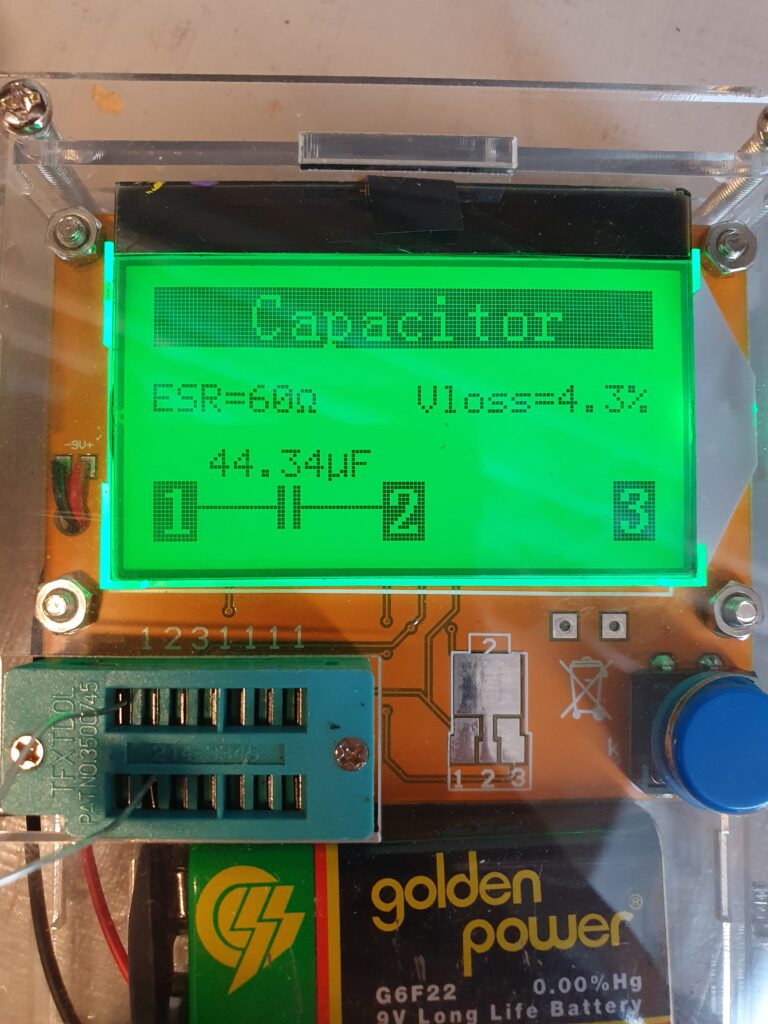
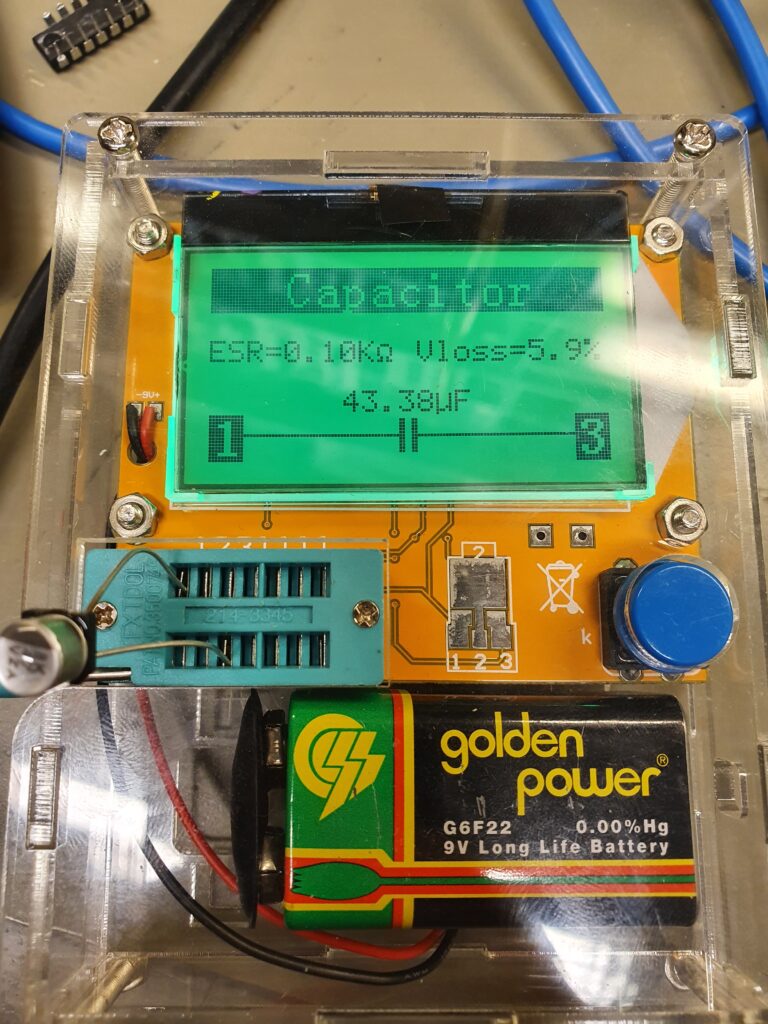
Men hvad er kilden til problemet så? Kondensatoren får over tid en alt for stor indre modstand, og spændingstabet bliver for stort. Her et par målinger uden og med lidt sprit til ekstra afkøling:

En helt ny kondensator måler under 1 ohms modstand, altså 100 gange så lille indre modstand:

En ny kondensator kan findes ved at søge på “47 uf 16 v smd electrolytic capacitor”, f.x. TME.eu, eller endnu mere lokalt fra el-supply.dk.

Efter erstatning pumper pumpen lystigt.

Så hvad kan man lære af hele denne historie?
Grundfos laver mekanisk gode pumper, men sparer på deres elektronik. Det er trist at tænke på hvor mange pumper der mon er smidt ud lang tid før tid. Man kan nok ikke beskylde Grundfos for “planned obsolence” efter 13 år, men man kunne dog ønske at produktet fejlede i en mere brugbar konfiguration: f.x. at pumpen kører ved et minimum hvis elektronikken fejler.

Gemt under: Extern, HAL9k

Tags: ,

31 jan

0 Comments

Reparation af Aduro-tronic II

Af

Vi har en Aduro 1-2 brændeovn med Aduro-tronic, som vi generelt er rigtig glade for. Den har nu været i drift i 5 år, og har haft omkring 4500 optændinger. Generelt er designet rigtig fornuftigt, og med Aduro-tronic og Smart Response er det rigtig nemt at fyre korrekt. Den eneste anke må være at vi nu 2 gange har oplevet at Aduro-tronic stemplet har givet op:
Første gang købte jeg et nyt, men det viste sig at være ret nemt at reparere. Så da problemet opstod igen reparerede jeg bare det gamle stempel. Aduro-tronic er basalt set en utæt luftcylinder med en fjeder. Stemplet trykkes ind, fjederen bliver spændt og som luften langsomt trækker ud af cylinderen kører stemplet op igen. Hvor utæt cylinderen er justeres med den lille skrue, og dette sætter således tiden spjældet holdes åbent. Problemet opstår når aske, støv og lignende sætter sig inde i cylinderen, og over tid får foringen til at blive utæt. Derved er stemplet for utæt. Løsningen er simpel:
Tag forsigtigt fjederen af ved at trykke holderpladen ned og dreje den 90 grader.
Den øverste plade kan forsigtig tages ud. Jeg brugte en spidstang, og lidt vrikken fra side til side. Derefter kan selve stemplet med gummi-foring tages ud.
Rengør nu cylinderen, og smør stempel og cylinder med en lille smule silikone-spray der hjælper med at forsegle. Saml hele mekanikken igen, tryk stemplet ned og check at det nu bliver nede af sig selv. Når mekanikken igen er monteret på brændeovnen skal tiden nok indstilles forfra.

Gemt under: Extern, HAL9k

Tags: